文档的此部分涵盖对基于 Reactive Streams API构建的响应式Web应用程序的支持,
该应用程序可在非阻塞服务器(例如:Netty,Undertow和Servlet 3.1+容器)上运行。各个章节涵盖了Spring WebFlux框架,
响应式WebClient,对测试的支持以及响应式库。
对于Servlet Web应用程序,请参阅基于Servlet栈的Web。
1. Spring WebFlux
Spring框架中包含的原始Web框架Spring Web MVC是专门为Servlet API和Servlet容器而构建的。 响应式栈Web框架Spring WebFlux在更高版本5.0中添加。它是完全非阻塞的, 支持 Reactive Streams背压,并在Netty,Undertow和Servlet 3.1+容器等服务器上运行。
这两个Web框架都反映了其源模块的名称
(spring-webmvc 和
spring-webflux),
并在Spring Framework中并存。每个模块都是可选的。应用程序可以使用一个模块或另一个模块,或者在某些情况下同时使用这两个模块,
例如:带有响应式 WebClient 的Spring MVC控制器。
1.1. 总览
为什么创建Spring WebFlux?
答案的一部分是需要一个非阻塞式的Web堆栈来处理少量线程的并发并使用更少的硬件资源进行扩展。
Servlet 3.1确实提供了用于非阻塞I/O的API。但是,使用它与Servlet API的其他部分不同,
后者的契约是同步的(Filter,Servlet)或阻塞的(getParameter,getPart)。
这是促使新的通用API成为所有非阻塞运行时的基础的动机。
这一点很重要,因为服务器(例如Netty)已在异步,非阻塞空间中得到了良好的建立。
答案的另一部分是函数式编程。就像在Java 5中添加注解会创造机会(例如:带注解的REST控制器或单元测试)一样,
在Java 8中添加lambda表达式也会为Java中的函数式API创造机会。这对于非阻塞的应用程序和流式API
(如由 CompletableFuture 和 ReactiveX普及的API)来说是一个福音,这些API允许以声明方式组合异步逻辑。
在编程模型级别,Java 8使Spring WebFlux能够与带注解的控制器一起提供函数式的Web端点。
1.1.1. 定义 “Reactive”
我们谈到了“非阻塞”和“函数式”,但是响应式意味着什么?
术语“响应式”是指围绕对变更做出响应的编程模型—网络组件对I/O事件做出响应,UI控制器对鼠标事件做出响应等。 从这个意义上说,非阻塞是响应式的,因为随着操作完成或数据可用,我们现在处于响应通知的模式,而不是被阻塞。
我们Spring团队还有另一个重要机制与“响应式”相关联,这是非阻塞背压的机制。 在同步命令式代码中,阻塞调用是强制调用者等待的一种自然的背压形式。 在非阻塞代码中,控制事件的速率非常重要,这样快速的生产者就不会淹没其目的地。
Reactive Streams是一个 小的规范 (在Java 9中也 采用了),它定义了带有背压的异步组件之间的交互。 例如,数据存储库(充当 发布者) 可以生成HTTP服务器(充当 订阅者) 可以写入响应的数据。Reactive Streams的主要目的是让订阅者控制发布者生成数据的速度。
|
常见问题:如果发布者不能放慢脚步怎么办? Reactive Streams的目的仅仅是建立机制和边界。如果发布者无法放慢速度,则必须决定是缓冲,删除还是失败。 |
1.1.2. Reactive API
Reactive Streams对于互操作性起着重要作用。库和基础设施组件对此很感兴趣,但是由于它太底层了,它作为应用程序API的用处不大。
应用程序需要更高级别且功能更丰富的API来构成异步逻辑—这与Java 8 Stream API相似,但不只是适用于集合。这就是响应式库的作用。
Reactor是Spring WebFlux的首选响应式库。
它提供了 Mono和
Flux API类型,
以通过与ReactiveX 运算符词汇对齐的丰富运算符集来处理
0..1 (Mono) 和 0..N (Flux)的数据序列。Reactor是Reactive Streams库,
因此,它的所有运算符都支持非阻塞背压。Reactor非常注重服务器端Java。它是与Spring紧密合作开发的。
WebFlux需要Reactor作为核心依赖项,但是它可以通过Reactive Streams与其他React库进行互操作。
通常,WebFlux API接受普通的 Publisher 作为输入,在内部将其适配成Reactor类型,使用它,然后返回 Flux 或 Mono 作为输出。
因此,你可以将任何 Publisher 作为输入传递,并且可以对输出应用操作,但是你需要调整输出以与其他响应式库一起使用。
只要可行(例如:带注解的控制器),WebFlux就会透明地适应RxJava或其他响应式库的使用。有关更多详细信息,请参见[webflux-reactive-libraries]。
1.1.3. 编程模型
spring-web 模块包含Spring WebFlux的响应式基础,包括HTTP抽象,用于支持的服务器的Reactive Streams适配器,
编解码器以及与Servlet API相似但具有非阻塞契约的核心WebHandler API。
在此基础上,Spring WebFlux提供了两种编程模型的选择:
1.1.4. 适用性
Spring MVC or WebFlux?
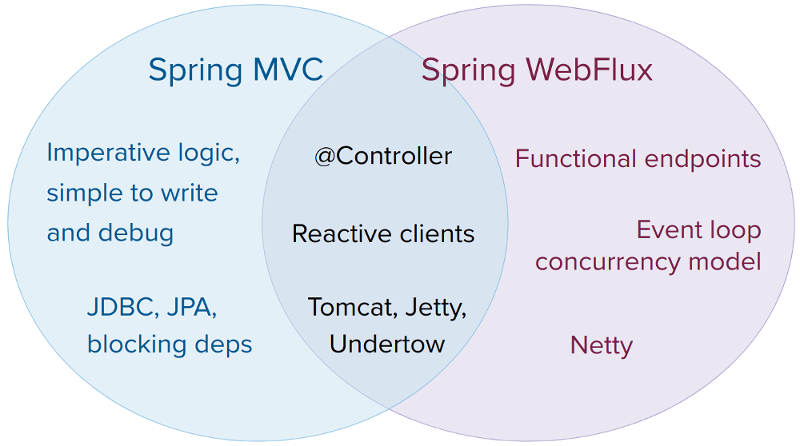
这是一个很自然的问题,但却产生了一个不合理的二分法。实际上,两者共同努力扩大了可用选项的范围。 两者的设计旨在实现彼此的连续性和一致性,它们可以并行使用,并且来自每一方的反馈对双方都有利。 下图显示了两者之间的关系,它们的共同点以及各自的独特支持:
我们建议你考虑以下几点:
-
如果你有运行正常的Spring MVC应用程序,则无需更改。 命令式编程是编写,理解和调试代码的最简单方法。你有最大的库选择空间,因为从历史上看,大多数库都是阻塞的。
-
如果你已经在购买非阻塞Web堆栈,那么Spring WebFlux在此空间中提供的执行模型优势与其他模型相同, 并且还提供服务器选择(Netty,Tomcat,Jetty,Undertow和Servlet 3.1+容器), 编程模型选择(带注解的控制器和功能性Web端点),以及响应式库的选择(Reactor,RxJava或其他)。
-
如果你对与Java 8 lambda或Kotlin一起使用的轻量级函数式Web框架感兴趣,则可以使用Spring WebFlux函数式Web端点。 对于要求较低复杂性的较小应用程序或微服务(可以受益于更高的透明度和控制)而言,这也是一个不错的选择。
-
在微服务架构中,你可以混合使用带有Spring MVC或Spring WebFlux控制器或带有Spring WebFlux函数式端点的应用程序。 两个框架都支持相同的基于注解的编程模型,这使得重用知识变得更加容易,同时还为正确的工作选择了正确的工具。
-
评估应用程序的一种简单方法是检查其依赖关系。如果你要使用阻塞性持久性API(JPA,JDBC)或网络API, 则Spring MVC至少是常见体系结构的最佳选择。使用Reactor和RxJava在单独的线程上执行阻塞调用在技术上是可行的, 但你不会充分利用非阻塞Web堆栈。
-
如果你的Spring MVC应用程序具有对远程服务的调用,请尝试响应式
WebClient。你可以直接从Spring MVC控制器方法返回响应式类型(Reactor,RxJava,或其他)。 每次调用的延迟或调用之间的相互依赖性越大,好处就越明显。Spring MVC控制器也可以调用其他响应式组件。 -
如果你有庞大的团队,请牢记向无阻塞,函数式和声明性编程过渡过程中陡峭的学习曲线。 一种无需完全切换即可开始的实用方法是使用响应式
WebClient。除此之外,从小处着手并衡量收益。 我们希望,对于广泛的应用程序,这种转变是不必要的。如果不确定要寻找什么好处, 请先了解非阻塞I/O的工作原理(例如:单线程Node.js上的并发性)及其影响。
1.1.5. 服务器
Tomcat,Jetty,Servlet 3.1+容器以及非Servlet运行时(例如:Netty和Undertow)都支持Spring WebFlux。 所有服务器都适应于低级通用API,因此可以跨服务器支持更高级别的 编程模型。
Spring WebFlux不具有内置支持来启动或停止服务器。但是,从Spring配置和WebFlux基础设施 组装一个应用程序并用几行代码运行它很容易。
Spring Boot具有一个WebFlux启动器,可以自动执行这些步骤。默认情况下,starter使用Netty, 但通过更改Maven或Gradle依赖关系,可以轻松切换到Tomcat,Jetty或Undertow。 Spring Boot默认为Netty,因为它在异步,非阻塞空间中得到更广泛的使用,并允许客户端和服务器共享资源。
Tomcat和Jetty可以与Spring MVC和WebFlux一起使用。但是请记住,它们的使用方式非常不同。 Spring MVC依靠Servlet阻塞I/O,并允许应用程序在需要时直接使用Servlet API。 Spring WebFlux依赖于Servlet 3.1非阻塞I/O,并在底层适配器后面使用Servlet API,并且不公开供直接使用。
对于Undertow,Spring WebFlux直接使用Undertow API,而无需使用Servlet API。
1.1.6. 性能
性能具有许多特征和意义。响应式和非阻塞通常不会使应用程序运行得更快。
在某些情况下,它们可以(例如:如果使用 WebClient 并行执行远程调用)。
总体而言,以非阻塞方式进行操作需要更多的工作,这可能会稍微增加所需的处理时间。
响应式和非阻塞性的主要预期好处是能够以较少的固定数量的线程和较少的内存进行扩展。 这使应用程序在负载下更具弹性,因为它们以更可预测的方式扩展。 然而,为了能观察到这些好处,你需要一些延迟(包括缓慢的和不可预测的网络I/O)。 这就是响应式堆栈开始显示其优势的地方,差异可能是巨大的。
1.1.7. 并发模型
Spring MVC和Spring WebFlux都支持带注解的控制器,但是在并发模型以及对阻塞和线程的默认假设存在关键差异。
在Spring MVC(通常是servlet应用程序)中,假设应用程序可以阻塞当前线程(例如:用于远程调用), 因此,servlet容器使用大型线程池来吸收请求处理过程中可能出现的阻塞。
在Spring WebFlux(通常是非阻塞服务器)中,假设应用程序未阻塞,因此,非阻塞服务器使用固定大小的小型线程池 (事件循环工作器)来处理请求。
| “按比例缩放”和“少量线程”听起来可能是矛盾的,但是从不阻塞当前线程(而是依靠回调)意味着你不需要额外的线程, 因为没有阻塞调用可供吸收。 |
如果确实需要使用阻止库怎么办?Reactor和RxJava都提供了 publishOn 运算符以继续在其他线程上进行处理。
这意味着容易逃生。但是请记住,阻塞式API不适用于此并发模型。
在Reactor和RxJava中,你可以通过运算符声明逻辑,然后在运行时形成一个响应式管道,在其中以不同的阶段顺序处理数据。 这样做的主要好处是,它使应用程序不必保护可变状态,因为该管道中的应用程序代码永远不会被同时调用。
你期望在运行Spring WebFlux的服务器上看到哪些线程?
-
在“原始” Spring WebFlux服务器上(例如:没有数据访问权限或其他可选依赖项),你可以期望该服务器有一个线程, 而其他几个线程则可以进行请求处理(通常与CPU核心数量一样多)。但是,Servlet容器可能以更多的线程 (例如:Tomcat上为10)开始,以同时支持servlet(阻塞)I/O和Servlet 3.1(非阻塞)I/O使用。
-
响应式
WebClient以事件循环方式运行。因此,你可以看到与之相关的固定数量的处理线程 (例如,带有Reactor Netty连接器的react-http-nio-)。但是,如果客户端和服务器都使用Reactor Netty, 则默认情况下,两者共享事件循环资源。 -
Reactor和RxJava提供称为调度程序的线程池抽象,以与
publishOn运算符配合使用,该运算符用于将处理切换到其他线程池。 调度程序具有建议特定并发策略的名称—例如:“parallel”(对于具有有限数量线程的CPU绑定工作)或“elastic” (对于具有大量线程的I/O绑定)。如果看到这样的线程,则意味着某些代码正在使用特定的线程池Scheduler策略。 -
数据访问库和其他第三方依赖也可以创建和使用自己的线程。
1.2. Reactive核心
spring-web 模块包含以下对响应式Web应用程序的基本支持:
-
对于服务器请求处理,有两个级别的支持。
-
HttpHandler: 具有非阻塞I/O和Reactive Streams背压的HTTP请求处理的基本契约, 以及Reactor Netty,Undertow,Tomcat,Jetty和任何Servlet 3.1+容器的适配器。
-
WebHandlerAPI: 稍高级别的通用Web API,用于处理请求,在此之上构建了具体的编程模型,例如: 带注解的控制器和函数式端点。
-
-
对于客户端,有一个基本的
ClientHttpConnector契约,以执行具有非阻塞I/O和响应流背压的HTTP请求, 以及用于 Reactor Netty和响应式 Jetty HttpClient的适配器。 应用程序中使用的更高级别的WebClient就基于此基本协定。 -
对于客户端和服务器,编解码器用于序列化和反序列化HTTP请求和响应内容。
1.2.1. HttpHandler
HttpHandler 是具有单个方法的简单契约,用于处理请求和响应。 它故意设计成最小的,它的主要也是唯一目的是成为对不同HTTP服务器API的最小抽象。
下表描述了受支持的服务器API:
| 服务器名称 | 使用的服务器API | Reactive Streams支持 |
|---|---|---|
Netty |
Netty API |
|
Undertow |
Undertow API |
spring-web: Undertow to Reactive Streams bridge |
Tomcat |
Servlet 3.1 非阻塞I/O;读写ByteBuffers与byte[]的Tomcat API |
spring-web: Servlet 3.1 non-blocking I/O to Reactive Streams bridge |
Jetty |
Servlet 3.1 非阻塞I/O;写ByteBuffers与byte[]的Jetty API |
spring-web: Servlet 3.1 non-blocking I/O to Reactive Streams bridge |
Servlet 3.1 container |
Servlet 3.1 非阻塞I/O |
spring-web: Servlet 3.1 non-blocking I/O to Reactive Streams bridge |
下表描述了服务器依赖(另请参阅 受支持的版本):
| 服务器名称 | Group id | Artifact name |
|---|---|---|
Reactor Netty |
io.projectreactor.netty |
reactor-netty |
Undertow |
io.undertow |
undertow-core |
Tomcat |
org.apache.tomcat.embed |
tomcat-embed-core |
Jetty |
org.eclipse.jetty |
jetty-server, jetty-servlet |
下面的代码段显示了如何将 HttpHandler 适配器与每个服务器API一起使用:
Reactor Netty
HttpHandler handler = ...
ReactorHttpHandlerAdapter adapter = new ReactorHttpHandlerAdapter(handler);
HttpServer.create(host, port).newHandler(adapter).block();
Undertow
HttpHandler handler = ...
UndertowHttpHandlerAdapter adapter = new UndertowHttpHandlerAdapter(handler);
Undertow server = Undertow.builder().addHttpListener(port, host).setHandler(adapter).build();
server.start();
Tomcat
HttpHandler handler = ...
Servlet servlet = new TomcatHttpHandlerAdapter(handler);

Tomcat server = new Tomcat();
File base = new File(System.getProperty("java.io.tmpdir"));
Context rootContext = server.addContext("", base.getAbsolutePath());
Tomcat.addServlet(rootContext, "main", servlet);
rootContext.addServletMappingDecoded("/", "main");
server.setHost(host);
server.setPort(port);
server.start();
Jetty
HttpHandler handler = ...
Servlet servlet = new JettyHttpHandlerAdapter(handler);

Server server = new Server();
ServletContextHandler contextHandler = new ServletContextHandler(server, "");
contextHandler.addServlet(new ServletHolder(servlet), "/");
contextHandler.start();

ServerConnector connector = new ServerConnector(server);
connector.setHost(host);
connector.setPort(port);
server.addConnector(connector);
server.start();
Servlet 3.1+ 容器
要将其作为WAR部署到任何Servlet 3.1+容器,你可以继承
AbstractReactiveWebInitializer
并将其包括在WAR中。该类使用 ServletHttpHandlerAdapter 包装 HttpHandler 并将其注册为 Servlet。
1.2.2. WebHandler API
org.springframework.web.server 包基于HttpHandler契约构建,以提供通用的Web
API,以通过多个 WebExceptionHandler,
多个 WebFilter和
单个 WebHandler组件组成的链来处理请求。
通过简单地指向自动检测组件的Spring ApplicationContext
和/或通过向构建器注册组件,可以将该链与 WebHttpHandlerBuilder 放在一起。
尽管 HttpHandler 的目标很简单,即抽象化不同HTTP服务器的使用,但 WebHandler API
的目的是提供Web应用程序中常用的更广泛的功能集,例如:
-
具有属性的用户会话。
-
请求属性。
-
已解析请求的
Locale或Principal。 -
访问已解析和缓存的表单数据。
-
multipart数据的抽象。
-
和更多..
特殊bean类型
下表列出了 WebHttpHandlerBuilder 可以在Spring ApplicationContext 中自动检测的组件,
或者可以直接向其注册的组件:
| Bean名称 | Bean类型 | 计数 | 描述 |
|---|---|---|---|
<any> |
|
0..N |
提供对来自 |
<any> |
|
0..N |
在其余的过滤器链和目标 |
|
|
1 |
请求的处理程序。 |
|
|
0..1 |
通过 |
|
|
0..1 |
用于访问 |
|
|
0..1 |
通过 |
|
|
0..1 |
用于处理转发的类型标头,可以提取和删除它们,也可以只删除它们。默认情况下不使用。 |
表单数据
ServerWebExchange 公开以下访问表单数据的方法:
Mono<MultiValueMap<String, String>> getFormData();DefaultServerWebExchange 使用配置的 HttpMessageReader 将表单数据(application/x-www-form-urlencoded)
解析为 MultiValueMap。默认情况下,FormHttpMessageReader 配置为由 ServerCodecConfigurer Bean使用
(请参阅Web Handler API)。
Multipart数据
ServerWebExchange 公开以下访问multipart数据的方法:
Mono<MultiValueMap<String, Part>> getMultipartData();DefaultServerWebExchange 使用配置的 HttpMessageReader<MultiValueMap<String, Part>> 将
multipart/form-data 内容解析为 MultiValueMap。当前,
Synchronoss NIO Multipart是唯一受支持的第三方库,
并且是我们知道的用于非阻塞解析multipart请求的唯一库。
通过 ServerCodecConfigurer bean启用它(请参阅Web Handler API)。
要以流方式解析multipart数据,可以使用从 HttpMessageReader<Part> 返回的 Flux<Part>。
例如:在带注解的控制器中,使用 @RequestPart 意味着按名称对各个parts进行类似于
Map 的访问,因此需要完全解析multipart数据。相反,你可以使用 @RequestBody 将内容解码为
Flux<Part> 而不收集到 MultiValueMap。
Forwarded请求头
当请求通过代理(例如:负载均衡器)进行处理时,host,port和scheme可能会更改, 这使得从客户端角度创建指向正确的host,port和scheme的链接成为挑战。
RFC 7239定义了代理可以用来提供有关原始请求信息的 Forwarded HTTP头。
还有其他非标准请求头,包括 X-Forwarded-Host, X-Forwarded-Port,
X-Forwarded-Proto, X-Forwarded-Ssl 和 X-Forwarded-Prefix。
ForwardedHeaderTransformer 是一个组件,可根据转发的头部修改请求的host,port和scheme,然后删除这些头部。
你可以将其声明为名称为 forwardedHeaderTransformer 的Bean,并对其进行检测和使用。
对于转发的头部,存在安全方面的考虑,因为应用程序无法知道头部是由代理添加的,还是由恶意客户端添加的。
这就是为什么应配置信任边界处的代理以删除来自外部的不受信任的 Forwarded 头的原因。
你还可以使用 removeOnly=true 配置 ForwardedHeaderTransformer,在这种情况下,它将删除但不使用头。
在5.1版本中,ForwardedHeaderFilter 被 ForwardedHeaderTransformer 取代并弃用,
因此可以在创建exchange之前更早地处理forwarded头。如果仍然配置了过滤器,则将其从过滤器列表中删除,
而改用 ForwardedHeaderTransformer。
|
1.2.3. 过滤器
在WebHandler API中,可以使用 WebFilter 在过滤器和目标 WebHandler
的处理链的其余部分之前和之后应用拦截样式的逻辑。使用WebFlux配置时,注册 WebFilter 就像将其声明为Spring bean一样简单,
并且(可选)通过在bean声明上使用 @Order 或实现 Ordered 来表达优先级。
CORS
Spring WebFlux通过控制器上的注解为CORS配置提供了细粒度的支持。
但是,当你将其与Spring Security结合使用时,我们建议你依赖内置的 CorsFilter,
它必须排在Spring Security的过滤器链之前。
有关更多详细信息,请参见CORS和CORS WebFilter部分。
1.2.4. 异常
在WebHandler API中,可以使用 WebExceptionHandler 来处理 WebFilter
实例和目标 WebHandler 链中的异常。使用WebFlux配置时,
注册 WebExceptionHandler 就像将其声明为Spring bean一样简单,
并且(可选)通过在bean声明上使用 @Order 或实现 Ordered 来表达优先级。
下表描述了可用的 WebExceptionHandler 实现:
| 异常处理程序 | 描述 |
|---|---|
|
通过将响应设置为异常的HTTP状态码,提供对
|
|
该异常处理程序在WebFlux配置中声明。 |
1.2.5. 编解码器
spring-web 和 spring-core 模块提供支持,通过具有Reactive Streams背压的非阻塞I/O,
可以将字节内容与更高级别的对象之间的字节序列进行序列化和反序列化。以下介绍了此支持:
-
HttpMessageReader和HttpMessageWriter是对HTTP消息内容进行编码和解码的契约。 -
可以使用
EncoderHttpMessageWriter来包装Encoder,以使其适合在Web应用程序中使用,也可以使用DecoderHttpMessageReader来包装Decoder。 -
DataBuffer抽象了不同的字节缓冲区表示形式(例如:NettyByteBuf,java.nio.ByteBuffer等), 并且是所有编解码器都在处理的内容。有关此主题的更多信息,请参见“Spring Core”中的 数据缓冲区和编解码器部分。
spring-core 模块提供 byte[],ByteBuffer,DataBuffer,Resource 和 String 编码器和解码器实现。
spring-web 模块提供了Jackson JSON,Jackson Smile,JAXB2,Protocol Buffers和其他编码器和解码器,
以及web-only的HTTP消息读取器和写入器实现,用于表单数据,multipart内容,服务器发送事件等。
ClientCodecConfigurer 和 ServerCodecConfigurer 通常用于配置和自定义要在应用程序中使用的编解码器。
请参阅有关配置HTTP消息编解码器部分。
Jackson JSON
当存在Jackson库时,JSON和二进制JSON( Smile)都被支持。
Jackson2Decoder 的工作方式如下:
-
Jackson的异步,非阻塞解析器用于将字节块流聚合到
TokenBuffer的每个块中,每个块代表一个JSON对象。 -
每个
TokenBuffer都传递给Jackson的ObjectMapper以创建更高级别的对象。 -
当解码为单值发布者(例如:
Mono)时,有一个TokenBuffer。 -
当解码为多值发布者(例如:
Flux)时,一旦为一个完整的对象接收到足够的字节,每个TokenBuffer就会传递给ObjectMapper。 输入内容可以是JSON数组,如果内容类型为“application/stream+json”,则可以是行分隔的JSON。
Jackson2Encoder 的工作方式如下:
-
对于单个值发布者(例如:
Mono),只需通过ObjectMapper对其进行序列化即可。 -
对于具有“application/json”的多值发布者,默认情况下使用
Flux#collectToList()收集值,然后序列化结果集合。 -
对于具有流媒体类型(例如:
application/stream+json或application/stream+x-jackson-smile)的多值发布者, 请使用 行分隔的JSON格式分别编码,写入和刷新每个值。 -
对于SSE,将为每个事件调用
Jackson2Encoder,并刷新输出以确保交付没有延迟。
|
默认情况下, |
表单数据
FormHttpMessageReader 和 FormHttpMessageWriter 支持对“application/x-www-form-urlencoded”内容进行解码和编码。
在经常需要从多个位置访问表单内容的服务器端,ServerWebExchange 提供了专用的 getFormData() 方法,该方法通过
FormHttpMessageReader 解析内容,然后缓存结果以进行重复访问。请参阅WebHandler API部分中的表单数据。
一旦使用 getFormData(),就无法再从请求正文中读取最初的原始内容。
因此,应用程序应始终通过 ServerWebExchange 来访问缓存的表单数据,而不是从原始请求正文中进行读取。
Multipart
MultipartHttpMessageReader 和 MultipartHttpMessageWriter 支持对“multipart/form-data”内容进行解码和编码。
反过来,MultipartHttpMessageReader 委托给另一个 HttpMessageReader 进行实际解析为 Flux<Part>,
然后将这些parts简单地收集到 MultiValueMap 中。目前,
Synchronoss NIO Multipart
被用于实际解析。
在可能需要从多个位置访问multipart表单内容的服务器端,ServerWebExchange 提供了专用的 getMultipartData() 方法,
该方法通过 MultipartHttpMessageReader 解析内容,然后缓存结果以进行重复访问。
请参阅WebHandler API部分中的Multipart数据。
一旦使用 getMultipartData(),就无法再从请求正文中读取最初的原始内容。
因此,应用程序必须始终使用 getMultipartData() 来重复,类似于map的方式访问parts,否则必须依靠
SynchronossPartHttpMessageReader 来一次性访问 Flux<Part>。
限制
可以对缓冲部分或全部输入流的 Decoder 和 HttpMessageReader 实现进行配置,并限制要在内存中缓冲的最大字节数。
在某些情况下,由于输入被汇总并表示为单个对象而发生缓冲,例如:具有 @RequestBody byte[],
x-www-form-urlencoded 数据的控制器方法,等等。在分割输入流(例如:定界文本,JSON对象流等)时,流处理也会发生缓冲。
对于那些流情况,该限制适用于与流中一个对象关联的字节数。
要配置缓冲区大小,你可以检查给定的 Decoder 或 HttpMessageReader 是否公开了 maxInMemorySize 属性,
如果有,则Javadoc将具有有关默认值的详细信息。在WebFlux中,ServerCodecConfigurer 通过默认编解码器的
maxInMemorySize 属性,提供了一个位置设置所有的编解码器。在客户端,可以在
WebClient.Builder中更改限制。
对于Multipart解析,maxInMemorySize 属性限制了非文件parts的大小。对于文件parts,它确定将part写入磁盘的阈值。
对于写入磁盘的文件part,还有一个额外的 maxDiskUsagePerPart 属性可限制每个part的磁盘空间量。
还有一个 maxParts 属性,用于限制multipart请求中的parts总数。要在WebFlux中配置所有均为3个,你需要向
ServerCodecConfigurer 提供一个预先配置的 MultipartHttpMessageReader 实例。
Streaming
在流式传输HTTP响应(例如:text/event-stream, application/stream+json)时,定期发送数据很重要,
这样才能尽快(而不是稍后)可靠地检测到断开连接的客户端。这样的发送可以是仅注释,空的SSE事件或任何其他可以有效充当心跳的“无操作”数据。
DataBuffer
DataBuffer 是WebFlux中字节缓冲区的表示形式。参考的Spring Core部分在 数据缓冲区和编解码器一节中对此有更多的介绍。
要注意的关键点是,在诸如Netty之类的某些服务器上,字节缓冲区被池化并且对引用进行计数,
并且在消耗字节缓冲区时必须将其释放以避免内存泄漏。
WebFlux应用程序通常不需要关心此类问题,除非它们直接使用或产生数据缓冲区,而不是依赖于编解码器与更高级别的对象之间进行转换, 或者除非它们选择创建自定义编解码器。对于这种情况,请查看 数据缓冲区和编解码器中的信息, 尤其是有关 使用数据缓冲区部分。
1.2.6. 日志
Spring WebFlux中的DEBUG级别日志记录被设计为紧凑,最小化和人性化。它侧重于反复有用的高价值信息, 而其他信息则仅在调试特定问题时才有用。
TRACE级别的日志记录通常遵循与DEBUG相同的原则(例如:也不应成为firehose),但可用于调试任何问题。 另外,某些日志消息在TRACE vs DEBUG上可能显示不同级别的详细信息。
良好的日志记录来自使用日志的经验。如果你发现任何不符合既定目标的地方,请告诉我们。
日志Id
在WebFlux中,单个请求可以在多个线程上执行,并且线程ID对于关联属于特定请求的日志消息没有用。 这就是为什么WebFlux日志消息默认情况下带有特定于请求的ID的原因。
在服务器端,日志ID存储在 ServerWebExchange 属性
( LOG_ID_ATTRIBUTE)
中,而可从 ServerWebExchange#getLogPrefix() 获得基于该ID的完整格式前缀。
在 WebClient 端,日志ID存储在 ClientRequest 属性
( LOG_ID_ATTRIBUTE)
中,而完整格式的前缀可从 ClientRequest#logPrefix() 获得。
敏感数据
DEBUG 和 TRACE 日志记录可以记录敏感信息。这就是默认情况下屏蔽表单参数和头部的原因,并且必须显式启用它们以记录完整日志。
以下示例显示了如何对服务器端请求执行此操作:
@Configuration
@EnableWebFlux
class MyConfig implements WebFluxConfigurer {

    @Override
    public void configureHttpMessageCodecs(ServerCodecConfigurer configurer) {
        configurer.defaultCodecs().enableLoggingRequestDetails(true);
    }
}
以下示例显示了如何针对客户端请求执行此操作:
Consumer<ClientCodecConfigurer> consumer = configurer ->
        configurer.defaultCodecs().enableLoggingRequestDetails(true);

WebClient webClient = WebClient.builder()
        .exchangeStrategies(ExchangeStrategies.builder().codecs(consumer).build())
        .build();
自定义编解码器
应用程序可以注册自定义编解码器以支持其他媒体类型,也可以注册默认编解码器不支持的特定行为。
以下示例显示了如何针对客户端请求执行此操作:
Consumer<ClientCodecConfigurer> consumer = configurer -> {
        CustomDecoder customDecoder = new CustomDecoder();
        configurer.customCodecs().decoder(customDecoder);
        configurer.customCodecs().withDefaultCodecConfig(config ->
            customDecoder.maxInMemorySize(config.maxInMemorySize())
        );
}

WebClient webClient = WebClient.builder()
        .exchangeStrategies(strategies -> strategies.codecs(consumer))
        .build();
1.3. DispatcherHandler
Spring WebFlux与Spring MVC类似,是围绕前端控制器模式设计的,其中中央 WebHandler DispatcherHandler
提供了用于请求处理的共享算法,而实际工作是由可配置的委托组件执行的。该模型非常灵活,并支持多种工作流程。
DispatcherHandler 从Spring配置中发现所需的委托组件。它还被设计为Spring Bean本身,并实现
ApplicationContextAware 来访问其运行的上下文。如果以 webHandler 的bean名称声明了 DispatcherHandler
,则 WebHttpHandlerBuilder会发现它,
而 WebHttpHandlerBuilder 会将其与请求处理链组合在一起,如WebHandler API中所述。
WebFlux应用程序中的Spring配置通常包含:
-
Bean名称为
webHandler的DispatcherHandler -
WebFilter和WebExceptionHandlerbeans -
其它
将配置提供给 WebHttpHandlerBuilder 以构建处理链,如以下示例所示:
ApplicationContext context = ...
HttpHandler handler = WebHttpHandlerBuilder.applicationContext(context);
生成的 HttpHandler 已准备好与服务器适配器一起使用。
1.3.1. 特殊Bean类型
DispatcherHandler 委托给特殊的Bean处理请求并渲染适当的响应。
所谓“特殊bean”,是指实现WebFlux框架契约的Spring管理对象实例。
这些通常带有内置契约,但是你可以自定义它们的属性,扩展它们或替换它们。
下表列出了 DispatcherHandler 检测到的特殊bean。请注意,在较低级别还检测到其他一些bean
(请参阅Web Handler API中的特殊bean类型)。
| Bean类型 | 说明 |
|---|---|
|
将请求映射到处理程序。映射基于某些条件,这些条件的详细信息因 主要的 |
|
帮助 |
|
处理来自处理程序调用的结果,并最终确定响应。请参阅结果处理。 |
1.3.2. WebFlux配置
应用程序可以声明处理请求所需的基础设施bean(在Web Handler API
和DispatcherHandler下列出)。
但是,在大多数情况下,WebFlux配置是最佳起点。它声明了所需的bean,并提供了更高级别的配置回调API来对其进行自定义。
| Spring Boot依靠WebFlux配置来配置Spring WebFlux,并且还提供了许多额外的方便选项。 |
1.3.3. 处理过程
DispatcherHandler 处理请求的方式如下:
-
要求每个
HandlerMapping查找一个匹配的处理程序,并使用第一个匹配项。 -
如果找到处理程序,则通过适当的
HandlerAdapter执行该处理程序,该处理程序将执行的返回值公开为HandlerResult。 -
通过直接写入响应或使用视图渲染,将
HandlerResult提供给适当的HandlerResultHandler以完成处理。
1.3.4. 结果处理
通过 HandlerAdapter 调用处理程序的返回值连同其他一些上下文一起包装为 HandlerResult,
并传递给第一个支持该处理程序的 HandlerResultHandler。
下表显示了可用的 HandlerResultHandler 实现,所有实现都在WebFlux配置中声明:
| 结果处理程序类型 | 返回值 | 默认顺序 |
|---|---|---|
|
|
0 |
|
|
0 |
|
处理 |
100 |
|
另请参阅视图解析。 |
|
1.3.5. 异常
从 HandlerAdapter 返回的 HandlerResult 可以公开基于某些特定于处理程序的机制进行错误处理的函数。
在以下情况下将调用此错误函数:
-
处理程序(例如:
@Controller)调用失败。 -
通过
HandlerResultHandler处理处理程序返回值失败。
只要在从处理程序返回的响应式类型产生任何数据项之前发生错误信号,错误函数就可以更改响应(例如:更改为错误状态)。
这就是支持 @Controller 类中的 @ExceptionHandler 方法的方式。相比之下,Spring
MVC中对相同功能的支持建立在 HandlerExceptionResolver 之上。这通常不重要。但是,请记住,在WebFlux中,不能使用
@ControllerAdvice 来处理在选择处理程序之前发生的异常。
1.3.6. 视图解析
视图解析使你可以使用HTML模板和模型渲染到浏览器,而无需将你与特定的视图技术联系在一起。
在Spring WebFlux中,通过专用的 HandlerResultHandler 支持视图解析,
该 HandlerResultHandler 使用 ViewResolver 实例将 String(表示逻辑视图名称)映射到 View 实例。然后使用 View 渲染响应。
处理过程
传递给 ViewResolutionResultHandler 的 HandlerResult 包含处理程序的返回值和包含请求处理期间添加的属性的模型。
返回值将作为以下值之一进行处理:
-
String,CharSequence:通过配置的ViewResolver实现列表解析为View的逻辑视图名称。 -
void:根据请求路径选择默认视图名称,减去前导斜杠和尾部斜杠,然后将其解析为视图。 当未提供视图名称(例如:返回模型属性)或异步返回值(例如:Mono完成为空)时,也会发生同样的情况。 -
Rendering: 用于视图解析方案的API。通过IDE中的代码完成探索其选项。
-
Model,Map:额外的模型属性将添加到请求的模型中。 -
任何其他:任何其他返回值(由 BeanUtils#isSimpleProperty 确定的简单类型除外)都将被视为要添加到模型的模型属性。属性名称是通过使用 约定 从类名称派生的,除非在处理程序方法上存在
@ModelAttribute注解。
该模型可以包含异步,响应式类型(例如:来自Reactor或RxJava)。在渲染之前,AbstractView 将此类模型属性解析为具体值并更新模型。
单值响应式类型被解析为单个值或无值(如果为空),而多值响应式类型(例如:Flux<T>)被收集并解析为 List<T>。
配置视图解析就像在Spring配置中添加 ViewResolutionResultHandler bean一样简单。
WebFlux Config提供了专用于视图解析的配置API。
有关与Spring WebFlux集成的视图技术的更多信息,请参见视图技术。
重定向
视图名称中的特殊 redirect: 前缀使你可以执行重定向。UrlBasedViewResolver(和子类)将其识别为需要重定向的指令。
视图名称的其余部分是重定向URL。
最终效果与控制器已返回 RedirectView 或 Rendering.redirectTo("abc").build() 相同,
但是现在控制器本身可以根据逻辑视图名称进行操作。视图名称(例如:redirect:/some/resource)是相对于当前应用程序的,
而视图名称(例如:redirect:http://example.com/arbitrary/path)将重定向到绝对URL。
内容协商
ViewResolutionResultHandler 支持内容协商。它将请求媒体类型与每个所选视图支持的媒体类型进行比较。
使用支持请求的媒体类型的第一个视图。
为了支持JSON和XML之类的媒体类型,Spring WebFlux提供了 HttpMessageWriterView,这是一个通过HttpMessageWriter渲染的特殊 View。
通常,你可以通过WebFlux配置将其配置为默认视图。
如果默认视图与请求的媒体类型匹配,则始终会选择和使用它们。
1.4. 带注解的控制器
Spring WebFlux提供了一个基于注解的编程模型,其中 @Controller 和 @RestController
组件使用注解来表达请求映射,请求输入,处理异常等。带注解的控制器具有灵活的方法签名,无需扩展基类或实现特定的接口。
以下清单显示了一个基本示例:
@RestController
public class HelloController {

    @GetMapping("/hello")
    public String handle() {
        return "Hello WebFlux";
    }
}
在前面的示例中,该方法返回要写入响应体的 String。
1.4.1. @Controller
你可以使用标准的Spring bean定义来定义控制器bean。@Controller 构造型允许自动检测,并且与Spring常规支持保持一致,
以支持在类路径中检测 @Component 类并为其自动注册Bean定义。它还充当带注解类的构造型,表明其作为Web组件的作用。
要启用对此类 @Controller bean的自动检测,可以将组件扫描添加到Java配置中,如以下示例所示:
@Configuration
@ComponentScan("org.example.web") (1)
public class WebConfig {

    // ...
}| 1 | 扫描 org.example.web 软件包。 |
@RestController 是一个组合式注解,其本身使用 @Controller 和
@ResponseBody 进行了元注解,表示一个控制器,其每个方法都继承了类型级别的 @ResponseBody 注解,
因此直接将其写入响应体,而不是使用HTML模板进行视图解析和渲染。
1.4.2. 请求映射
@RequestMapping 注解用于将请求映射到控制器方法。它具有各种属性,可以通过URL,HTTP方法,请求参数,标头和媒体类型进行匹配。
你可以在类级别使用它来表示共享的映射,也可以在方法级别使用它来缩小到特定的端点映射。
@RequestMapping 还有特定于HTTP方法的快捷方式:
-
@GetMapping -
@PostMapping -
@PutMapping -
@DeleteMapping -
@PatchMapping
前面的注解是提供的自定义注解,因为可以说,大多数控制器方法应该映射到特定的HTTP方法,
而不是使用 @RequestMapping,后者默认情况下与所有HTTP方法匹配。同时,在类级别仍需要 @RequestMapping 来表示共享映射。
以下示例使用类型和方法级别的映射:
@RestController
@RequestMapping("/persons")
class PersonController {

    @GetMapping("/{id}")
    public Person getPerson(@PathVariable Long id) {
        // ...
    }

    @PostMapping
    @ResponseStatus(HttpStatus.CREATED)
    public void add(@RequestBody Person person) {
        // ...
    }
}
URI模式
你可以使用全局模式和通配符来映射请求:
-
?匹配一个字符 -
*匹配路径段中的零个或多个字符 -
**匹配零个或多个路径段
你还可以声明URI变量并使用 @PathVariable 访问其值,如以下示例所示:
@GetMapping("/owners/{ownerId}/pets/{petId}")
public Pet findPet(@PathVariable Long ownerId, @PathVariable Long petId) {
    // ...
}
你可以在类和方法级别声明URI变量,如以下示例所示:
@Controller
@RequestMapping("/owners/{ownerId}") (1)
public class OwnerController {

    @GetMapping("/pets/{petId}") (2)
    public Pet findPet(@PathVariable Long ownerId, @PathVariable Long petId) {
        // ...
    }
}| 1 | 类级URI映射。 |
| 2 | 方法级URI映射。 |
URI变量会自动转换为适当的类型,或者引发 TypeMismatchException。默认情况下支持简单类型(int,long,Date
等),你可以注册对任何其他数据类型的支持。请参阅Type Conversion和DataBinder。
你可以显式地命名URI变量(例如,@PathVariable("customId")),但是如果名称相同并且你的代码是使用调试信息或
Java 8上的 -parameters 编译器标志进行编译的,则可以省略该详细信息。
语法 {*varName} 声明了一个与零个或多个剩余路径段匹配的URI变量。例如:/resources/{*path} 匹配所有文件
/resources/ ,并且“path”变量捕获完整的相对路径。
语法 {varName:regex} 声明带有正则表达式的URI变量,语法为 {varName:regex}。例如,给定URL
"/spring-web-3.0.5.jar",以下方法提取名称,版本和文件扩展名:
@GetMapping("/{name:[a-z-]+}-{version:\\d\\.\\d\\.\\d}{ext:\\.[a-z]+}")
public void handle(@PathVariable String version, @PathVariable String ext) {
    // ...
}
URI路径模式也可以嵌入 ${…} 占位符,这些占位符在启动时通过针对本地,系统,环境和其他属性源使用
PropertyPlaceHolderConfigurer 进行解析。例如,你可以使用它来基于一些外部配置参数化基本URL。
Spring WebFlux使用 PathPattern 和 PathPatternParser 获得URI路径匹配支持。
这两个类都位于 spring-web 中,它们是专门为web应用程序中的HTTP URL路径设计的,
用于在运行时匹配大量的URI路径模式。
|
Spring WebFlux不支持后缀模式匹配—这与Spring MVC不同,后者的映射(例如 /person)也匹配到 /person.*。
对于基于URL的内容协商,如果需要,我们建议使用查询参数,它更简单,更明确,并且不易受到基于URL路径的攻击。
模式比较
当多个模式与URL匹配时,必须将它们进行比较以找到最佳匹配。这是通过 PathPattern.SPECIFICITY_COMPARATOR 完成的,该工具查找更具体的模式。
对于每个模式,都会根据URI变量和通配符的数量计算得分,其中URI变量的得分低于通配符。总得分较低的模式将获胜。如果两个模式的分数相同,则选择较长的模式。
包罗万象的模式(例如: **, {*varName})不计入评分,而是始终排在最后。如果两种模式都适用,则选择较长的模式。
可消费的媒体类型
你可以根据请求的 Content-Type 缩小请求映射,如以下示例所示:
@PostMapping(path = "/pets", consumes = "application/json")
public void addPet(@RequestBody Pet pet) {
    // ...
}
consumes 属性还支持否定表达式 — 例如,!text/plain 表示除 text/plain 之外的任何内容类型。
你可以在类级别上声明一个共享的 consumes 属性。但是,与大多数其他请求映射属性不同,同时使用类级别和方法级别时,
方法级别 consumes 属性覆盖而不是扩展类级别声明。
MediaType 为常用的媒体类型提供常量,例如 APPLICATION_JSON_VALUE 和 APPLICATION_XML_VALUE。
|
可生产的媒体类型
你可以根据 Accept 请求头和控制器方法生成的内容类型列表来缩小请求映射,如以下示例所示:
@GetMapping(path = "/pets/{petId}", produces = "application/json;charset=UTF-8")
@ResponseBody
public Pet getPet(@PathVariable String petId) {
    // ...
}
媒体类型可以指定字符集。支持否定的表达式 — 例如,!text/plain 表示除 text/plain 之外的任何内容类型。
你可以在类级别声明共享的 produces 属性。但是,与大多数其他请求映射属性不同,同时使用类级别和方法级别时,
方法级别 produces 属性覆盖而不是扩展类级别声明。
MediaType 为常用的媒体类型提供常量,例如 APPLICATION_JSON_VALUE 和 APPLICATION_XML_VALUE。
|
请求参数,请求头
你可以根据查询参数条件来缩小请求映射。你可以测试是否存在查询参数(myParam),或不存在查询参数(!myParam)
或查询参数有特定值(myParam=myValue)。以下示例显示如何测试特定值:
@GetMapping(path = "/pets/{petId}", params = "myParam=myValue") (1)
public void findPet(@PathVariable String petId) {
    // ...
}| 1 | 测试 myParam 是否等于 myValue。 |
你还可以将其与请求头条件一起使用,如以下示例所示:
@GetMapping(path = "/pets", headers = "myHeader=myValue") (1)
public void findPet(@PathVariable String petId) {
    // ...
}| 1 | 测试 myHeader 是否等于 myValue。 |
HTTP HEAD, OPTIONS
@GetMapping (和 @RequestMapping(method=HttpMethod.GET)) 透明地支持HTTP HEAD以进行请求映射。
控制器方法无需更改。HttpHandler 服务器适配器中应用的响应包装器确保将 Content-Length 标头设置为写入的字节数,而无需实际写入响应。
默认情况下,通过将 Allow 响应头设置为所有具有匹配URL模式的 @RequestMapping 方法中列出的HTTP方法列表
来处理HTTP OPTIONS。
对于没有HTTP方法声明的 @RequestMapping,将 Allow 响应头设置为 GET,HEAD,POST,PUT,PATCH,DELETE,OPTIONS。
建议控制器方法应始终声明支持的HTTP方法(例如,通过使用特定于HTTP方法的变体:@GetMapping,@PostMapping 等)。
你可以将 @RequestMapping 方法显式映射到HTTP HEAD和HTTP OPTIONS,但这通常不是必需的。
自定义注解
Spring WebFlux支持将组合注解用于请求映射。
这些注解本身使用 @RequestMapping 进行元注解,并且旨在以更狭窄,
更具体的用途重新声明 @RequestMapping 属性的子集(或全部)。
@GetMapping, @PostMapping, @PutMapping, @DeleteMapping 和 @PatchMapping 是组合注解的示例。
之所以提供它们,是因为可以说,大多数控制器方法都应该映射到特定的HTTP方法,
而不是使用 @RequestMapping,后者默认情况下与所有HTTP方法都匹配。如果需要组合注解的示例,请查看如何声明它们。
Spring WebFlux还支持带有自定义请求匹配逻辑的自定义请求映射属性。这是一个更高级的选项,
它需要子类化 RequestMappingHandlerMapping 并覆盖 getCustomMethodCondition
方法,你可以在其中检查自定义属性并返回自己的 RequestCondition。
显式注册
你可以通过编程方式注册Handler方法,你可以将其用于动态注册或高级案例, 例如同一处理程序在不同URL下的不同实例。以下示例显示了如何执行此操作:
@Configuration
public class MyConfig {

    @Autowired
    public void setHandlerMapping(RequestMappingHandlerMapping mapping, UserHandler handler) (1)
            throws NoSuchMethodException {

        RequestMappingInfo info = RequestMappingInfo
                .paths("/user/{id}").methods(RequestMethod.GET).build(); (2)

        Method method = UserHandler.class.getMethod("getUser", Long.class); (3)

        mapping.registerMapping(info, handler, method); (4)
    }

}| 1 | 注入目标处理程序和控制器的处理程序映射。 |
| 2 | 准备请求映射元数据。 |
| 3 | 获取处理程序方法。 |
| 4 | 添加注册。 |
1.4.3. 处理程序方法
@RequestMapping handler methods have a flexible signature and can choose from a range of
supported controller method arguments and return values.
Method Arguments
The following table shows the supported controller method arguments.
Reactive types (Reactor, RxJava, or other) are supported on arguments that require blocking I/O (for example, reading the request body) to be resolved. This is marked in the Description column. Reactive types are not expected on arguments that do not require blocking.
JDK 1.8’s java.util.Optional is supported as a method argument in combination with
annotations that have a required attribute (for example, @RequestParam, @RequestHeader,
and others) and is equivalent to required=false.
| Controller method argument | Description |
|---|---|
|
Access to the full |
|
Access to the HTTP request or response. |
|
Access to the session. This does not force the start of a new session unless attributes are added. Supports reactive types. |
|
The currently authenticated user — possibly a specific |
|
The HTTP method of the request. |
|
The current request locale, determined by the most specific |
|
The time zone associated with the current request, as determined by a |
|
For access to URI template variables. See URI模式. |
|
For access to name-value pairs in URI path segments. See Matrix Variables. |
|
For access to Servlet request parameters. Parameter values are converted to the declared
method argument type. See Note that use of |
|
For access to request headers. Header values are converted to the declared method argument
type. See |
|
For access to cookies. Cookie values are converted to the declared method argument type.
See |
|
For access to the HTTP request body. Body content is converted to the declared method
argument type by using |
|
For access to request headers and body. The body is converted with |
|
For access to a part in a |
|
For access to the model that is used in HTML controllers and is exposed to templates as part of view rendering. |
|
For access to an existing attribute in the model (instantiated if not present) with
data binding and validation applied. See Note that use of |
|
For access to errors from validation and data binding for a command object
(that is, a |
|
For marking form processing complete, which triggers cleanup of session attributes
declared through a class-level |
|
For preparing a URL relative to the current request’s host, port, scheme, and path. See URI链接. |
|
For access to any session attribute — in contrast to model attributes stored in the session
as a result of a class-level |
|
For access to request attributes. See [webflux-ann-requestattrib] for more details. |
Any other argument |
If a method argument is not matched to any of the above, it is, by default, resolved as
a |
Return Values
The following table shows the supported controller method return values. Note that reactive types from libraries such as Reactor, RxJava, or other are generally supported for all return values.
| Controller method return value | Description |
|---|---|
|
The return value is encoded through |
|
The return value specifies the full response, including HTTP headers, and the body is encoded
through |
|
For returning a response with headers and no body. |
|
A view name to be resolved with |
|
A |
|
Attributes to be added to the implicit model, with the view name implicitly determined based on the request path. |
|
An attribute to be added to the model, with the view name implicitly determined based on the request path. Note that |
|
An API for model and view rendering scenarios. |
|
A method with a If none of the above is true, a |
|
Emit server-sent events. The |
Any other return value |
If a return value is not matched to any of the above, it is, by default, treated as a view
name, if it is |
Type Conversion
Some annotated controller method arguments that represent String-based request input (for example,
@RequestParam, @RequestHeader, @PathVariable, @MatrixVariable, and @CookieValue)
can require type conversion if the argument is declared as something other than String.
For such cases, type conversion is automatically applied based on the configured converters.
By default, simple types (such as int, long, Date, and others) are supported. Type conversion
can be customized through a WebDataBinder (see [mvc-ann-initbinder]) or by registering
Formatters with the FormattingConversionService (see
Spring Field Formatting).
Matrix Variables
RFC 3986 discusses name-value pairs in path segments. In Spring WebFlux, we refer to those as “matrix variables” based on an “old post” by Tim Berners-Lee, but they can be also be referred to as URI path parameters.
Matrix variables can appear in any path segment, with each variable separated by a semicolon and
multiple values separated by commas — for example, "/cars;color=red,green;year=2012". Multiple
values can also be specified through repeated variable names — for example,
"color=red;color=green;color=blue".
Unlike Spring MVC, in WebFlux, the presence or absence of matrix variables in a URL does not affect request mappings. In other words, you are not required to use a URI variable to mask variable content. That said, if you want to access matrix variables from a controller method, you need to add a URI variable to the path segment where matrix variables are expected. The following example shows how to do so:
// GET /pets/42;q=11;r=22

@GetMapping("/pets/{petId}")
public void findPet(@PathVariable String petId, @MatrixVariable int q) {

    // petId == 42
    // q == 11
}
Given that all path segments can contain matrix variables, you may sometimes need to disambiguate which path variable the matrix variable is expected to be in, as the following example shows:
// GET /owners/42;q=11/pets/21;q=22

@GetMapping("/owners/{ownerId}/pets/{petId}")
public void findPet(
        @MatrixVariable(name="q", pathVar="ownerId") int q1,
        @MatrixVariable(name="q", pathVar="petId") int q2) {

    // q1 == 11
    // q2 == 22
}
You can define a matrix variable may be defined as optional and specify a default value as the following example shows:
// GET /pets/42

@GetMapping("/pets/{petId}")
public void findPet(@MatrixVariable(required=false, defaultValue="1") int q) {

    // q == 1
}
To get all matrix variables, use a MultiValueMap, as the following example shows:
// GET /owners/42;q=11;r=12/pets/21;q=22;s=23

@GetMapping("/owners/{ownerId}/pets/{petId}")
public void findPet(
        @MatrixVariable MultiValueMap<String, String> matrixVars,
        @MatrixVariable(pathVar="petId"") MultiValueMap<String, String> petMatrixVars) {

    // matrixVars: ["q" : [11,22], "r" : 12, "s" : 23]
    // petMatrixVars: ["q" : 22, "s" : 23]
}
@RequestParam
You can use the @RequestParam annotation to bind query parameters to a method argument in a
controller. The following code snippet shows the usage:
@Controller
@RequestMapping("/pets")
public class EditPetForm {

    // ...

    @GetMapping
    public String setupForm(@RequestParam("petId") int petId, Model model) { (1)
        Pet pet = this.clinic.loadPet(petId);
        model.addAttribute("pet", pet);
        return "petForm";
    }

    // ...

}| 1 | Using @RequestParam. |
The Servlet API “request parameter” concept conflates query parameters, form
data, and multiparts into one. However, in WebFlux, each is accessed individually through
ServerWebExchange. While @RequestParam binds to query parameters only, you can use
data binding to apply query parameters, form data, and multiparts to a
command object.
|
Method parameters that use the @RequestParam annotation are required by default, but
you can specify that a method parameter is optional by setting the required flag of a @RequestParam
to false or by declaring the argument with a java.util.Optional
wrapper.
Type conversion is applied automatically if the target method parameter type is not
String. See [mvc-ann-typeconversion].
When a @RequestParam annotation is declared on a Map<String, String> or
MultiValueMap<String, String> argument, the map is populated with all query parameters.
Note that use of @RequestParam is optional — for example, to set its attributes. By
default, any argument that is a simple value type (as determined by
BeanUtils#isSimpleProperty)
and is not resolved by any other argument resolver is treated as if it were annotated
with @RequestParam.
@RequestHeader
You can use the @RequestHeader annotation to bind a request header to a method argument in a
controller.
The following example shows a request with headers:
Host                    localhost:8080
Accept                  text/html,application/xhtml+xml,application/xml;q=0.9
Accept-Language         fr,en-gb;q=0.7,en;q=0.3
Accept-Encoding         gzip,deflate
Accept-Charset          ISO-8859-1,utf-8;q=0.7,*;q=0.7
Keep-Alive              300
The following example gets the value of the Accept-Encoding and Keep-Alive headers:
@GetMapping("/demo")
public void handle(
        @RequestHeader("Accept-Encoding") String encoding, (1)
        @RequestHeader("Keep-Alive") long keepAlive) { (2)
    //...
}| 1 | Get the value of the Accept-Encoging header. |
| 2 | Get the value of the Keep-Alive header. |
Type conversion is applied automatically if the target method parameter type is not
String. See [mvc-ann-typeconversion].
When a @RequestHeader annotation is used on a Map<String, String>,
MultiValueMap<String, String>, or HttpHeaders argument, the map is populated
with all header values.
Built-in support is available for converting a comma-separated string into an
array or collection of strings or other types known to the type conversion system. For
example, a method parameter annotated with @RequestHeader("Accept") may be of type
String but also of String[] or List<String>.
|
@CookieValue
You can use the @CookieValue annotation to bind the value of an HTTP cookie to a method argument
in a controller.
The following example shows a request with a cookie:
JSESSIONID=415A4AC178C59DACE0B2C9CA727CDD84
The following code sample demonstrates how to get the cookie value:
@GetMapping("/demo")
public void handle(@CookieValue("JSESSIONID") String cookie) { (1)
    //...
}| 1 | Get the cookie value. |
Type conversion is applied automatically if the target method parameter type is not
String. See [mvc-ann-typeconversion].
@ModelAttribute
You can use the @ModelAttribute annotation on a method argument to access an attribute from the
model or have it instantiated if not present. The model attribute is also overlain with
the values of query parameters and form fields whose names match to field names. This is
referred to as data binding, and it saves you from having to deal with parsing and
converting individual query parameters and form fields. The following example binds an instance of Pet:
@PostMapping("/owners/{ownerId}/pets/{petId}/edit")
public String processSubmit(@ModelAttribute Pet pet) { } (1)| 1 | Bind an instance of Pet. |
The Pet instance in the preceding example is resolved as follows:
-
From the model if already added through
Model. -
From the HTTP session through
@SessionAttributes. -
From the invocation of a default constructor.
-
From the invocation of a “primary constructor” with arguments that match query parameters or form fields. Argument names are determined through JavaBeans
@ConstructorPropertiesor through runtime-retained parameter names in the bytecode.
After the model attribute instance is obtained, data binding is applied. The
WebExchangeDataBinder class matches names of query parameters and form fields to field
names on the target Object. Matching fields are populated after type conversion is applied
where necessary. For more on data binding (and validation), see
Validation. For more on customizing data binding, see
DataBinder.
Data binding can result in errors. By default, a WebExchangeBindException is raised, but,
to check for such errors in the controller method, you can add a BindingResult argument
immediately next to the @ModelAttribute, as the following example shows:
@PostMapping("/owners/{ownerId}/pets/{petId}/edit")
public String processSubmit(@ModelAttribute("pet") Pet pet, BindingResult result) { (1)
    if (result.hasErrors()) {
        return "petForm";
    }
    // ...
}| 1 | Adding a BindingResult. |
You can automatically apply validation after data binding by adding the
javax.validation.Valid annotation or Spring’s @Validated annotation (see also
Bean validation and
Spring validation). The following example uses the @Valid annotation:
@PostMapping("/owners/{ownerId}/pets/{petId}/edit")
public String processSubmit(@Valid @ModelAttribute("pet") Pet pet, BindingResult result) { (1)
    if (result.hasErrors()) {
        return "petForm";
    }
    // ...
}| 1 | Using @Valid on a model attribute argument. |
Spring WebFlux, unlike Spring MVC, supports reactive types in the model — for example,
Mono<Account> or io.reactivex.Single<Account>. You can declare a @ModelAttribute argument
with or without a reactive type wrapper, and it will be resolved accordingly,
to the actual value if necessary. However, note that, to use a BindingResult
argument, you must declare the @ModelAttribute argument before it without a reactive
type wrapper, as shown earlier. Alternatively, you can handle any errors through the
reactive type, as the following example shows:
@PostMapping("/owners/{ownerId}/pets/{petId}/edit")
public Mono<String> processSubmit(@Valid @ModelAttribute("pet") Mono<Pet> petMono) {
    return petMono
        .flatMap(pet -> {
            // ...
        })
        .onErrorResume(ex -> {
            // ...
        });
}
Note that use of @ModelAttribute is optional — for example, to set its attributes.
By default, any argument that is not a simple value type( as determined by
BeanUtils#isSimpleProperty)
and is not resolved by any other argument resolver is treated as if it were annotated
with @ModelAttribute.
@SessionAttributes
@SessionAttributes is used to store model attributes in the WebSession between
requests. It is a type-level annotation that declares session attributes used by a
specific controller. This typically lists the names of model attributes or types of
model attributes that should be transparently stored in the session for subsequent
requests to access.
Consider the following example:
@Controller
@SessionAttributes("pet") (1)
public class EditPetForm {
    // ...
}| 1 | Using the @SessionAttributes annotation. |
On the first request, when a model attribute with the name, pet, is added to the model,
it is automatically promoted to and saved in the WebSession. It remains there until
another controller method uses a SessionStatus method argument to clear the storage,
as the following example shows:
@Controller
@SessionAttributes("pet") (1)
public class EditPetForm {

    // ...

    @PostMapping("/pets/{id}")
    public String handle(Pet pet, BindingResult errors, SessionStatus status) { (2)
        if (errors.hasErrors) {
            // ...
        }
            status.setComplete();
            // ...
        }
    }
}| 1 | Using the @SessionAttributes annotation. |
| 2 | Using a SessionStatus variable. |
@SessionAttribute
If you need access to pre-existing session attributes that are managed globally
(that is, outside the controller — for example, by a filter) and may or may not be present,
you can use the @SessionAttribute annotation on a method parameter, as the following example shows:
@GetMapping("/")
public String handle(@SessionAttribute User user) { (1)
    // ...
}| 1 | Using @SessionAttribute. |
For use cases that require adding or removing session attributes, consider injecting
WebSession into the controller method.
For temporary storage of model attributes in the session as part of a controller
workflow, consider using SessionAttributes, as described in
@SessionAttributes.
Similarly to @SessionAttribute, you can use the @RequestAttribute annotation to
access pre-existing request attributes created earlier (for example, by a WebFilter),
as the following example shows:
@GetMapping("/")
public String handle(@RequestAttribute Client client) { (1)
    // ...
}| 1 | Using @RequestAttribute. |
Multipart Content
As explained in Multipart数据, ServerWebExchange provides access to multipart
content. The best way to handle a file upload form (for example, from a browser) in a controller
is through data binding to a command object,
as the following example shows:
class MyForm {

    private String name;

    private MultipartFile file;

    // ...

}

@Controller
public class FileUploadController {

    @PostMapping("/form")
    public String handleFormUpload(MyForm form, BindingResult errors) {
        // ...
    }

}
You can also submit multipart requests from non-browser clients in a RESTful service scenario. The following example uses a file along with JSON:
POST /someUrl
Content-Type: multipart/mixed

--edt7Tfrdusa7r3lNQc79vXuhIIMlatb7PQg7Vp
Content-Disposition: form-data; name="meta-data"
Content-Type: application/json; charset=UTF-8
Content-Transfer-Encoding: 8bit

{
    "name": "value"
}
--edt7Tfrdusa7r3lNQc79vXuhIIMlatb7PQg7Vp
Content-Disposition: form-data; name="file-data"; filename="file.properties"
Content-Type: text/xml
Content-Transfer-Encoding: 8bit
... File Data ...
You can access individual parts with @RequestPart, as the following example shows:
@PostMapping("/")
public String handle(@RequestPart("meta-data") Part metadata, (1)
        @RequestPart("file-data") FilePart file) { (2)
    // ...
}| 1 | Using @RequestPart to get the metadata. |
| 2 | Using @RequestPart to get the file. |
To deserialize the raw part content (for example, to JSON — similar to @RequestBody),
you can declare a concrete target Object, instead of Part, as the following example shows:
@PostMapping("/")
public String handle(@RequestPart("meta-data") MetaData metadata) { (1)
    // ...
}| 1 | Using @RequestPart to get the metadata. |
You can use @RequestPart combination with javax.validation.Valid or Spring’s
@Validated annotation, which causes Standard Bean Validation to be applied.
By default, validation errors cause a WebExchangeBindException, which is turned
into a 400 (BAD_REQUEST) response. Alternatively, you can handle validation errors locally
within the controller through an Errors or BindingResult argument, as the following example shows:
@PostMapping("/")
public String handle(@Valid @RequestPart("meta-data") MetaData metadata, (1)
        BindingResult result) { (2)
    // ...
}| 1 | Using a @Valid annotation. |
| 2 | Using a BindingResult argument. |
To access all multipart data as a MultiValueMap, you can use @RequestBody,
as the following example shows:
@PostMapping("/")
public String handle(@RequestBody Mono<MultiValueMap<String, Part>> parts) { (1)
    // ...
}| 1 | Using @RequestBody. |
To access multipart data sequentially, in streaming fashion, you can use @RequestBody with
Flux<Part> instead, as the following example shows:
@PostMapping("/")
public String handle(@RequestBody Flux<Part> parts) { (1)
    // ...
}| 1 | Using @RequestBody. |
@RequestBody
You can use the @RequestBody annotation to have the request body read and deserialized into an
Object through an HttpMessageReader.
The following example uses a @RequestBody argument:
@PostMapping("/accounts")
public void handle(@RequestBody Account account) {
    // ...
}
Unlike Spring MVC, in WebFlux, the @RequestBody method argument supports reactive types
and fully non-blocking reading and (client-to-server) streaming. The following example
uses a Mono:
@PostMapping("/accounts")
public void handle(@RequestBody Mono<Account> account) {
    // ...
}
You can use the HTTP消息编解码器 option of the WebFlux配置 to configure or customize message readers.
You can use @RequestBody in combination with javax.validation.Valid or Spring’s
@Validated annotation, which causes Standard Bean Validation to be applied.
By default, validation errors cause a WebExchangeBindException, which is turned
into a 400 (BAD_REQUEST) response. Alternatively, you can handle validation errors locally
within the controller through an Errors or a BindingResult argument. The following
example uses a BindingResult argument:
@PostMapping("/accounts")
public void handle(@Valid @RequestBody Account account, BindingResult result) {
    // ...
}
HttpEntity
HttpEntity is more or less identical to using @RequestBody but is based on a
container object that exposes request headers and the body. The following example uses an
HttpEntity:
@PostMapping("/accounts")
public void handle(HttpEntity<Account> entity) {
    // ...
}
@ResponseBody
You can use the @ResponseBody annotation on a method to have the return serialized to the
response body through an HttpMessageWriter. The following example shows how to do so:
@GetMapping("/accounts/{id}")
@ResponseBody
public Account handle() {
    // ...
}
@ResponseBody is also supported at the class level, in which case it is inherited by
all controller methods. This is the effect of @RestController, which is nothing more
than a meta-annotation marked with @Controller and @ResponseBody.
@ResponseBody supports reactive types, which means you can return Reactor or RxJava
types and have the asynchronous values they produce rendered to the response.
For additional details, see Streaming and
JSON rendering.
You can combine @ResponseBody methods with JSON serialization views.
See Jackson JSON for details.
You can use the HTTP消息编解码器 option of the WebFlux配置 to configure or customize message writing.
ResponseEntity
ResponseEntity is like @ResponseBody but with status and headers. For example:
@GetMapping("/something")
public ResponseEntity<String> handle() {
    String body = ... ;
    String etag = ... ;
    return ResponseEntity.ok().eTag(etag).build(body);
}
WebFlux supports using a single value reactive type to
produce the ResponseEntity asynchronously, and/or single and multi-value reactive types
for the body.
Jackson JSON
Spring offers support for the Jackson JSON library.
Jackson Serialization Views
Spring WebFlux provides built-in support for
Jackson’s Serialization Views,
which allows rendering only a subset of all fields in an Object. To use it with
@ResponseBody or ResponseEntity controller methods, you can use Jackson’s
@JsonView annotation to activate a serialization view class, as the following example shows:
@RestController
public class UserController {

    @GetMapping("/user")
    @JsonView(User.WithoutPasswordView.class)
    public User getUser() {
        return new User("eric", "7!jd#h23");
    }
}

public class User {

    public interface WithoutPasswordView {};
    public interface WithPasswordView extends WithoutPasswordView {};

    private String username;
    private String password;

    public User() {
    }

    public User(String username, String password) {
        this.username = username;
        this.password = password;
    }

    @JsonView(WithoutPasswordView.class)
    public String getUsername() {
        return this.username;
    }

    @JsonView(WithPasswordView.class)
    public String getPassword() {
        return this.password;
    }
}
@JsonView allows an array of view classes but you can only specify only one per
controller method. Use a composite interface if you need to activate multiple views.
|
1.4.4. Model
你可以使用 @ModelAttribute 注解:
-
在
@RequestMapping方法中的方法参数上, 可从模型创建或访问Object,并将其通过WebDataBinder绑定到请求。 -
作为
@Controller或@ControllerAdvice类中的方法级注解,可在任何@RequestMapping方法调用之前帮助初始化模型。 -
在
@RequestMapping方法上标记它的返回值是一个模型属性。
本节讨论 @ModelAttribute 方法 — 前面列表中的第二项。控制器可以具有任意数量的 @ModelAttribute 方法。
所有此类方法均在同一控制器中的 @RequestMapping 方法之前调用。也可以通过 @ControllerAdvice 在控制器之间共享
@ModelAttribute 方法。有关更多详细信息,请参阅控制器通知部分。
@ModelAttribute 方法具有灵活的方法签名。它们支持与 @RequestMapping 方法相同的许多参数,除了
@ModelAttribute 本身或与请求正文相关的任何东西。
下面的示例使用 @ModelAttribute 方法:
@ModelAttribute
public void populateModel(@RequestParam String number, Model model) {
    model.addAttribute(accountRepository.findAccount(number));
    // add more ...
}
以下示例仅添加一个属性:
@ModelAttribute
public Account addAccount(@RequestParam String number) {
    return accountRepository.findAccount(number);
}
如果未明确指定名称,则根据类型选择默认名称,如 Conventions的javadoc中所述。
你始终可以使用重载的 addAttribute 方法或通过 @ModelAttribute 上的 name 属性(用于返回值)来分配显式名称。
|
与Spring MVC不同,Spring WebFlux在模型中显式支持响应式类型(例如:Mono<Account> 或 io.reactivex.Single<Account>)。
可以在 @RequestMapping 调用时将此类异步模型属性透明地解析(并更新模型)为其实际值,
只要声明了 @ModelAttribute 参数而没有包装,如以下示例所示:
@ModelAttribute
public void addAccount(@RequestParam String number) {
    Mono<Account> accountMono = accountRepository.findAccount(number);
    model.addAttribute("account", accountMono);
}

@PostMapping("/accounts")
public String handle(@ModelAttribute Account account, BindingResult errors) {
    // ...
}
另外,任何具有响应式类型包装器的模型属性都将在视图渲染之前解析为其实际值(并更新了模型)。
你也可以将 @ModelAttribute 用作 @RequestMapping 方法上的方法级注释,
在这种情况下,@RequestMapping 方法的返回值将解释为模型属性。通常不需要这样做,因为它是HTML控制器的默认行为,
除非返回值是一个 String,不这样做它将被解释为视图名称。@ModelAttribute 还可以自定义模型属性名称,如以下示例所示:
@GetMapping("/accounts/{id}")
@ModelAttribute("myAccount")
public Account handle() {
    // ...
    return account;
}
1.4.5. DataBinder
@Controller 或 @ControllerAdvice 类可以具有用于初始化 WebDataBinder 实例的 @InitBinder 方法,而这些方法又可以:
-
将请求参数(即表单或查询数据)绑定到模型对象。
-
将基于字符串的请求值(例如请求参数,路径变量,请求头,Cookie等)转换为控制器方法参数的目标类型。
-
呈现HTML表单时,将模型对象的值格式化为
String值。
@InitBinder 方法可以注册特定于控制器的 java.bean.PropertyEditor 或
Spring Converter 和 Formatter 组件。另外,你可以使用WebFlux Java配置在全局共享的
FormattingConversionService 中注册 Converter 和 Formatter 类型。
@InitBinder 方法支持与 @RequestMapping 方法相同的许多参数,除了 @ModelAttribute(命令对象)参数。
通常,它们使用 WebDataBinder 参数(用于注册)和 void 返回值声明。以下清单显示了一个示例:
@Controller
public class FormController {

    @InitBinder (1)
    public void initBinder(WebDataBinder binder) {
        SimpleDateFormat dateFormat = new SimpleDateFormat("yyyy-MM-dd");
        dateFormat.setLenient(false);
        binder.registerCustomEditor(Date.class, new CustomDateEditor(dateFormat, false));
    }

    // ...
}| 1 | 使用 @InitBinder 注解。 |
另外,当通过共享的 FormattingConversionService 使用基于
Formatter 的设置时,可以重新使用相同的方法并注册特定于控制器的 Formatter 实现,如以下示例所示:
@Controller
public class FormController {

    @InitBinder
    protected void initBinder(WebDataBinder binder) {
        binder.addCustomFormatter(new DateFormatter("yyyy-MM-dd")); (1)
    }

    // ...
}| 1 | 添加自定义格式化器(在这种情况下为 DateFormatter)。 |
1.4.6. 管理异常
@Controller 和@ControllerAdvice类可以具有 @ExceptionHandler 方法来处理来自控制器方法的异常。
下面的示例包括这样的处理程序方法:
@Controller
public class SimpleController {

    // ...

    @ExceptionHandler (1)
    public ResponseEntity<String> handle(IOException ex) {
        // ...
    }
}| 1 | 声明一个 @ExceptionHandler。 |
该异常可能与正在传播的顶级异常(即直接抛出 IOException)匹配,也可能与顶级包装器异常(例如,包装在 IllegalStateException 内部的
IOException)内的直接cause匹配。
对于匹配的异常类型,最好将目标异常声明为方法参数,如前面的示例所示。或者,注解声明可以缩小异常类型以使其匹配。
我们通常建议在参数签名中尽可能具体,并在以相应顺序优先的 @ControllerAdvice 上声明你的主要root异常映射。
有关详细信息,请参见MVC部分。
WebFlux中的 @ExceptionHandler 方法支持与 @RequestMapping 方法相同的方法参数和返回值,
但与请求体和 @ModelAttribute 相关的方法参数除外。
|
HandlerAdapter 为 @RequestMapping 方法提供对Spring WebFlux中 @ExceptionHandler 方法的支持。
有关更多详细信息,请参见DispatcherHandler。
REST API异常
REST服务的常见要求是在响应正文中包含错误详细信息。Spring框架不会自动执行此操作,
因为响应主体中错误详细信息的表示是特定于应用程序的。但是,@RestController 可以将 @ExceptionHandler
方法与 ResponseEntity 返回值一起使用,以设置响应的状态和主体。也可以在 @ControllerAdvice
类中声明此类方法,以将其全局应用。
请注意,Spring WebFlux与Spring MVC ResponseEntityExceptionHandler 没有等效项,
因为WebFlux仅引发 ResponseStatusException(或其子类),并且不需要将其转换为HTTP状态码。
|
1.4.7. 控制器通知
通常,@ExceptionHandler,@InitBinder 和 @ModelAttribute 方法在声明它们的 @Controller 类
(或类层次结构)中应用。如果希望此类方法在全局范围内(跨控制器)应用,则可以在带有 @ControllerAdvice
或 @RestControllerAdvice 注解的类中声明它们。
@ControllerAdvice 带有 @Component 注解,这意味着可以通过
组件扫描将此类注册为Spring Bean。
@RestControllerAdvice 是由 @ControllerAdvice 和 @ResponseBody 注解的组合注解,
这实际上意味着 @ExceptionHandler 方法通过消息转换(相对于视图解析或模板渲染)呈现给响应体的。
启动时,@RequestMapping 和 @ExceptionHandler 方法的基础结构类将检测使用 @ControllerAdvice 注解的Spring bean,
然后在运行时应用其方法。全局 @ExceptionHandler 方法(来自 @ControllerAdvice)在本地方法(来自 @Controller)
之后 应用。相比之下,全局 @ModelAttribute 和 @InitBinder 方法在本地方法 之前 应用。
默认情况下,@ControllerAdvice 方法适用于每个请求(即所有控制器),但是你可以通过使用注解上的属性将其范围缩小
到控制器的子集,如以下示例所示:
// Target all Controllers annotated with @RestController
@ControllerAdvice(annotations = RestController.class)
public class ExampleAdvice1 {}

// Target all Controllers within specific packages
@ControllerAdvice("org.example.controllers")
public class ExampleAdvice2 {}

// Target all Controllers assignable to specific classes
@ControllerAdvice(assignableTypes = {ControllerInterface.class, AbstractController.class})
public class ExampleAdvice3 {}
前面示例中的选择器在运行时进行评估,如果广泛使用,可能会对性能产生负面影响。有关更多详细信息,请参见
@ControllerAdvicejavadoc。
1.5. 函数式端点
Spring WebFlux包含WebFlux.fn,这是一个轻量级的函数式编程模型,其中的函数用于路由和处理请求, 而契约则是为不变性而设计的。它是基于注解的编程模型的替代方案,但可以在相同的 Reactive核心基础上运行。
1.5.1. 概览
在WebFlux.fn中,HTTP请求由 HandlerFunction 处理:该函数接受 ServerRequest 并返回延迟的 ServerResponse
(即 Mono<ServerResponse>)。请求和响应对象都有不可变的契约,这些契约提供对HTTP请求和响应的JDK 8友好访问。
HandlerFunction 等效于基于注解的编程模型中 @RequestMapping 方法的主体。
传入的请求通过 RouterFunction 路由到处理程序函数:该函数接受 ServerRequest 并返回延迟的 HandlerFunction
(即 Mono<HandlerFunction>)。当路由器函数匹配时,返回处理程序函数。否则为空Mono。
RouterFunction 等效于 @RequestMapping 注解,但主要区别在于路由器函数不仅提供数据,还提供行为。
RouterFunctions.route() 提供了一个路由器构建器,可简化路由器的创建过程,如以下示例所示:
import static org.springframework.http.MediaType.APPLICATION_JSON;
import static org.springframework.web.reactive.function.server.RequestPredicates.*;
import static org.springframework.web.reactive.function.server.RouterFunctions.route;

PersonRepository repository = ...
PersonHandler handler = new PersonHandler(repository);

RouterFunction<ServerResponse> route = route()
    .GET("/person/{id}", accept(APPLICATION_JSON), handler::getPerson)
    .GET("/person", accept(APPLICATION_JSON), handler::listPeople)
    .POST("/person", handler::createPerson)
    .build();


public class PersonHandler {

    // ...

    public Mono<ServerResponse> listPeople(ServerRequest request) {
        // ...
    }

    public Mono<ServerResponse> createPerson(ServerRequest request) {
        // ...
    }

    public Mono<ServerResponse> getPerson(ServerRequest request) {
        // ...
    }
}
运行 RouterFunction 的一种方法是将其转换为 HttpHandler 并通过内置
服务器适配器之一进行安装:
-
RouterFunctions.toHttpHandler(RouterFunction) -
RouterFunctions.toHttpHandler(RouterFunction, HandlerStrategies)
大多数应用程序都可以通过WebFlux Java配置运行,请参阅运行服务器。
1.5.2. HandlerFunction
ServerRequest 和 ServerResponse 是不可变的接口,它们提供JDK 8友好的HTTP请求和响应访问。
请求和响应都提供对主体流的 Reactive Streams背压。请求主体用Reactor Flux 或 Mono 表示。
响应主体由任何Reactive Streams Publisher 组成,包括 Flux 和 Mono。有关更多信息,请参见
响应式库。
ServerRequest
ServerRequest 提供对HTTP方法,URI,标头和查询参数的访问,而通过 body 方法提供对主体的访问。
下面的示例将请求体提取到 Mono<String>:
Mono<String> string = request.bodyToMono(String.class);以下示例将主体提取到 Flux<Person>(或Kotlin中的 Flux<Person>),其中 Person 对象从某种序列化形式(例如:JSON或XML)解码:
Flux<Person> people = request.bodyToFlux(Person.class);前面的示例是使用更通用的 ServerRequest.body(BodyExtractor) 的快捷方式,该请求接受
BodyExtractor 函数式策略接口。实用工具类 BodyExtractors 提供对许多实例的访问。例如,前面的示例也可以编写如下:
Mono<String> string = request.body(BodyExtractors.toMono(String.class));
Flux<Person> people = request.body(BodyExtractors.toFlux(Person.class));
下面的示例显示如何访问表单数据:
Mono<MultiValueMap<String, String> map = request.formData();以下示例显示了如何以map形式访问multipart数据:
Mono<MultiValueMap<String, Part> map = request.multipartData();下面的示例演示如何以流方式一次访问multiparts:
Flux<Part> parts = request.body(BodyExtractos.toParts());ServerResponse
ServerResponse 提供对HTTP响应的访问,并且由于它是不可变的,因此你可以使用 build 方法来创建它。
你可以使用构建器来设置响应状态,添加响应头或提供响应体。以下示例使用JSON内容创建200(OK)响应:
Mono<Person> person = ...
ServerResponse.ok().contentType(MediaType.APPLICATION_JSON).body(person, Person.class);
下面的示例演示如何构建一个具有 Location 标头且没有正文的201(CREATED)响应:
URI location = ...
ServerResponse.created(location).build();
根据所使用的编解码器,可以传递提示参数以自定义主体的序列化或反序列化方式。例如,要指定 Jackson JSON视图:
ServerResponse.ok().hint(Jackson2CodecSupport.JSON_VIEW_HINT, MyJacksonView.class).body(...);处理程序类
我们可以将处理程序函数编写为lambda,如以下示例所示:
HandlerFunction<ServerResponse> helloWorld =
  request -> ServerResponse.ok().body(fromObject("Hello World"));
这很方便,但是在应用程序中我们需要多个函数,并且多个内联lambda可能会变得凌乱。
因此,将相关的处理程序函数分组到一个处理程序类中很有用,该类的作用与基于注解的应用程序中的
@Controller 相似。例如,以下类公开了响应式类型 Person 存储库:
import static org.springframework.http.MediaType.APPLICATION_JSON;
import static org.springframework.web.reactive.function.ServerResponse.ok;
import static org.springframework.web.reactive.function.BodyInserters.fromObject;

public class PersonHandler {

    private final PersonRepository repository;

    public PersonHandler(PersonRepository repository) {
        this.repository = repository;
    }

    public Mono<ServerResponse> listPeople(ServerRequest request) { (1)
        Flux<Person> people = repository.allPeople();
        return ok().contentType(APPLICATION_JSON).body(people, Person.class);
    }

    public Mono<ServerResponse> createPerson(ServerRequest request) { (2)
        Mono<Person> person = request.bodyToMono(Person.class);
        return ok().build(repository.savePerson(person));
    }

    public Mono<ServerResponse> getPerson(ServerRequest request) { (3)
        int personId = Integer.valueOf(request.pathVariable("id"));
        return repository.getPerson(personId)
            .flatMap(person -> ok().contentType(APPLICATION_JSON).body(fromObject(person)))
            .switchIfEmpty(ServerResponse.notFound().build());
    }
}| 1 | listPeople 是一个处理函数,它以JSON格式返回存储库中找到的所有 Person 对象。 |
| 2 | createPerson 是一个处理函数,用于存储请求正文中包含的新 Person。请注意,PersonRepository.savePerson(Person)
返回 Mono<Void>:一个空的 Mono,当从请求中读取并存储此人时,它将发出完成信号。
因此,当接收到完成信号时(即 Person 保存完毕时),我们使用 build(Publisher<Void>) 方法发送响应。 |
| 3 | getPerson 是一个处理程序函数,它返回由 id 路径变量标识的单个人。我们从存储库中检索该
Person 并创建一个JSON响应(如果找到)。如果未找到,则使用 switchIfEmpty(Mono<T>)
返回404 Not Found响应。 |
验证
public class PersonHandler {

    private final Validator validator = new PersonValidator(); (1)

    // ...

    public Mono<ServerResponse> createPerson(ServerRequest request) {
        Mono<Person> person = request.bodyToMono(Person.class).doOnNext(this::validate); (2)
        return ok().build(repository.savePerson(person));
    }

    private void validate(Person person) {
        Errors errors = new BeanPropertyBindingResult(body, "person");
        validator.validate(body, errors);
        if (errors.hasErrors) {
            throw new ServerWebInputException(errors.toString()); (3)
        }
}| 1 | 创建 Validator 实例。 |
| 2 | 应用验证。 |
| 3 | 引发400响应的异常。 |
处理程序还可以通过基于 LocalValidatorFactoryBean 创建和注入全局 Validator 实例来使用标准Bean验证API(JSR-303)。
请参阅 Spring Validation。
1.5.3. RouterFunction
路由器函数用于将请求路由到相应的 HandlerFunction。通常,你不是自己编写路由器函数,
而是使用 RouterFunctions 实用工具类上的方法来创建一个。RouterFunctions.route()(无参数)
为你提供了流式生成器,用于创建路由器函数,而 RouterFunctions.route(RequestPredicate,HandlerFunction)
提供了直接创建路由器的方法。
通常,建议使用 route() 构建器,因为它为典型的映射方案提供了便捷的快捷方式,而无需难以发现的静态导入。
例如,路由器函数构建器提供了 GET(String, HandlerFunction) 方法来为GET请求创建映射,
和 POST(String, HandlerFunction) 来为POST请求创建映射。
除了基于HTTP方法的映射外,路由构建器还提供了一种在映射到请求时引入其他谓词的方法。
对于每个HTTP方法,都有一个重载的变体,它以 RequestPredicate 作为参数,但是可以表示哪些额外的约束。
谓词
你可以编写自己的 RequestPredicate,但是 RequestPredicates 实用工具类根据请求路径,HTTP方法,
内容类型等提供许多常用的实现。以下示例使用请求谓词基于 Accept 头创建约束:
RouterFunction<ServerResponse> route = RouterFunctions.route()
    .GET("/hello-world", accept(MediaType.TEXT_PLAIN),
        request -> Response.ok().body(fromObject("Hello World")));
你可以使用以下命令组合多个请求谓词:
-
RequestPredicate.and(RequestPredicate)— 两者必须匹配。 -
RequestPredicate.or(RequestPredicate)— 任何一个匹配即可。
RequestPredicates 中的许多谓词都是组合的。例如,RequestPredicates.GET(String) 由
RequestPredicates.method(HttpMethod) 和 RequestPredicates.path(String) 组合。
上面显示的示例还使用了两个请求谓词,因为构建器在内部使用 RequestPredicates.GET 并将其与 accept 谓词组合在一起。
路由
路由器函数按顺序评估:如果第一个路由不匹配,则评估第二个路由,依此类推。 因此,在通用路由之前声明更具体的路由是有意义的。请注意,此行为不同于基于注解的编程模型,在该模型中,将自动选择“最特定”的控制器方法。
使用路由器函数生成器时,所有定义的路由都组成一个 RouterFunction,从 build() 返回。还有其他方法可以将多个路由器函数组合在一起:
-
在
RouterFunctions.route()构建器上执行add(RouterFunction) -
RouterFunction.and(RouterFunction) -
RouterFunction.andRoute(RequestPredicate, HandlerFunction)— 具有嵌套RouterFunctions.route()的RouterFunction.and()的快捷方式。
以下示例显示了四种路由的组合:
import static org.springframework.http.MediaType.APPLICATION_JSON;
import static org.springframework.web.reactive.function.server.RequestPredicates.*;

PersonRepository repository = ...
PersonHandler handler = new PersonHandler(repository);

RouterFunction<ServerResponse> otherRoute = ...

RouterFunction<ServerResponse> route = route()
    .GET("/person/{id}", accept(APPLICATION_JSON), handler::getPerson) (1)
    .GET("/person", accept(APPLICATION_JSON), handler::listPeople) (2)
    .POST("/person", handler::createPerson) (3)
    .add(otherRoute) (4)
.build();| 1 | 带有与JSON匹配的 Accept 标头的 GET /person/{id} 被路由到 PersonHandler.getPerson |
| 2 | 带有与JSON匹配的 Accept 标头的 GET /person 被路由到 PersonHandler.listPeople |
| 3 | 没有其他谓词的 POST /person 被路由到 PersonHandler.createPerson,并且 |
| 4 | otherRoute 是在其他地方创建的路由器函数,并将其添加到构建的路由中。 |
嵌套路由
一组路由器函数通常具有共享谓词,例如:共享路径。在上面的示例中,共享谓词将是与 /person 匹配的路径谓词,由三个路由使用。
使用注解时,你可以通过使用映射到 /person 的类级别 @RequestMapping 注解来删除此重复项。
在WebFlux.fn中,可以通过路由器函数构建器上的 path 方法共享路径谓词。
例如,以上示例的最后几行可以通过使用嵌套路由以以下方式进行改进:
RouterFunction<ServerResponse> route = route()
    .path("/person", builder -> builder
        .GET("/{id}", accept(APPLICATION_JSON), handler::getPerson)
        .GET("", accept(APPLICATION_JSON), handler::listPeople)
        .POST("/person", handler::createPerson))
.build();请注意,path 的第二个参数是使用路由器构建器的消费者。
尽管基于路径的嵌套是最常见的,但是你可以通过使用构建器上的 nest 方法来嵌套在任何种类的谓词上。
上面的内容仍然包含一些以共享的 Accept-header 谓词形式出现的重复。通过将 nest 方法与 accept 一起使用,我们可以进一步改进:
RouterFunction<ServerResponse> route = route()
    .path("/person", b1 -> b1
        .nest(accept(APPLICATION_JSON), b2 -> b2
            .GET("/{id}", handler::getPerson)
            .GET("", handler::listPeople))
        .POST("/person", handler::createPerson))
    .build();
1.5.4. 运行服务器
如何在HTTP服务器中运行路由器函数?一个简单的选项是使用以下方法之一将路由器函数转换为 HttpHandler:
-
RouterFunctions.toHttpHandler(RouterFunction) -
RouterFunctions.toHttpHandler(RouterFunction, HandlerStrategies)
然后,可以通过遵循HttpHandler来获取特定于服务器的指令,将返回的
HttpHandler 与许多服务器适配器一起使用。
Spring Boot还使用了一个更典型的选项,即通过WebFlux配置使用基于
DispatcherHandler的设置来运行,
该配置使用Spring配置声明处理请求所需的组件。WebFlux Java配置声明以下基础设施组件以支持函数式端点:
-
RouterFunctionMapping: 在Spring配置中检测一个或多个RouterFunction<?>bean,通过RouterFunction.andOther组合它们, 并将请求路由到生成的组合RouterFunction。 -
HandlerFunctionAdapter: 简单的适配器,使DispatcherHandler调用映射到请求的HandlerFunction。 -
ServerResponseResultHandler: 通过调用ServerResponse的writeTo方法来处理HandlerFunction调用的结果。
前面的组件使函数式端点适合于 DispatcherHandler 请求处理生命周期,并且(如果有)声明的控制器也可以(可能)与带注解的控制器并排运行。
这也是Spring Boot WebFlux starter启用函数式端点的方式。
以下示例显示了WebFlux Java配置(有关如何运行它,请参见DispatcherHandler):
@Configuration
@EnableWebFlux
public class WebConfig implements WebFluxConfigurer {

    @Bean
    public RouterFunction<?> routerFunctionA() {
        // ...
    }

    @Bean
    public RouterFunction<?> routerFunctionB() {
        // ...
    }

    // ...

    @Override
    public void configureHttpMessageCodecs(ServerCodecConfigurer configurer) {
        // configure message conversion...
    }

    @Override
    public void addCorsMappings(CorsRegistry registry) {
        // configure CORS...
    }

    @Override
    public void configureViewResolvers(ViewResolverRegistry registry) {
        // configure view resolution for HTML rendering...
    }
}
1.5.5. 过滤处理程序函数
你可以使用路由函数构建器上的 before,after 或 filter 方法来过滤处理程序函数。使用注解,可以通过使用
@ControllerAdvice,ServletFilter 或同时使用两者来实现类似的功能。该过滤器将应用于构建器构建的所有路由。
这意味着在嵌套路由中定义的过滤器不适用于“顶级”路由。例如,考虑以下示例:
RouterFunction<ServerResponse> route = route()
    .path("/person", b1 -> b1
        .nest(accept(APPLICATION_JSON), b2 -> b2
            .GET("/{id}", handler::getPerson)
            .GET("", handler::listPeople)
            .before(request -> ServerRequest.from(request) (1)
                .header("X-RequestHeader", "Value")
                .build()))
        .POST("/person", handler::createPerson))
    .after((request, response) -> logResponse(response)) (2)
.build();| 1 | 添加自定义请求头的 before 过滤器仅应用于两个GET路由。 |
| 2 | 记录响应的 after 过滤器将应用于所有路由,包括嵌套路由。 |
路由器构建器上的 filter 方法采用 HandlerFilterFunction:
该函数采用 ServerRequest 和 HandlerFunction 并返回 ServerResponse。处理程序函数参数代表链中的下一个元素。
这通常是路由到的处理程序,但是如果应用了多个,它也可以是另一个过滤器。
现在,我们可以在路由中添加一个简单的安全过滤器,假设我们拥有一个可以确定是否允许特定路径的 SecurityManager。
以下示例显示了如何执行此操作:
SecurityManager securityManager = ...

RouterFunction<ServerResponse> route = route()
    .path("/person", b1 -> b1
        .nest(accept(APPLICATION_JSON), b2 -> b2
            .GET("/{id}", handler::getPerson)
            .GET("", handler::listPeople))
        .POST("/person", handler::createPerson))
    .filter((request, next) -> {
        if (securityManager.allowAccessTo(request.path())) {
            return next.handle(request);
        }
        else {
            return ServerResponse.status(UNAUTHORIZED).build();
        }
    })
    .build();
前面的示例演示了调用 next.handle(ServerRequest) 是可选的。当允许访问时,我们才允许执行处理函数。
除了在路由器函数构建器上使用 filter 方法之外,还可以通过 RouterFunction.filter(HandlerFilterFunction)
将过滤器应用于现有路由器函数。
通过专用的CorsWebFilter提供对函数式端点的CORS支持。
|
1.6. URI链接
本节描述了Spring框架中用于准备URIs的各种选项。
1.6.1. UriComponents
Spring MVC and Spring WebFlux
UriComponentsBuilder 有助于从具有变量的URI模板中构建URI,如以下示例所示:
UriComponents uriComponents = UriComponentsBuilder
        .fromUriString("http://example.com/hotels/{hotel}")  (1)
        .queryParam("q", "{q}")  (2)
        .encode() (3)
        .build(); (4)

URI uri = uriComponents.expand("Westin", "123").toUri(); (5)| 1 | 带有URI模板的静态工厂方法。 |
| 2 | 添加或替换URI组件。 |
| 3 | 请求对URI模板和URI变量进行编码。 |
| 4 | 构建一个 UriComponents。 |
| 5 | 设置变量并获取 URI。 |
可以将前面的示例合并为一个链,并通过 buildAndExpand 进行缩短,如以下示例所示:
URI uri = UriComponentsBuilder
        .fromUriString("http://example.com/hotels/{hotel}")
        .queryParam("q", "{q}")
        .encode()
        .buildAndExpand("Westin", "123")
        .toUri();
你可以通过直接传入URI(这意味着编码)来进一步缩短它,如以下示例所示:
URI uri = UriComponentsBuilder
        .fromUriString("http://example.com/hotels/{hotel}")
        .queryParam("q", "{q}")
        .build("Westin", "123");
你可以使用完整的URI模板进一步缩短它,如以下示例所示:
URI uri = UriComponentsBuilder
        .fromUriString("http://example.com/hotels/{hotel}?q={q}")
        .build("Westin", "123");
1.6.2. UriBuilder
Spring MVC and Spring WebFlux
UriComponentsBuilder 实现了 UriBuilder。
你可以依次使用 UriBuilderFactory 创建 UriBuilder。UriBuilderFactory 和 UriBuilder
一起提供了一种可插入的机制,可以基于共享配置(例如基本URL,编码首选项和其他详细信息)从URI模板构建URI。
你可以使用 UriBuilderFactory 配置 RestTemplate 和 WebClient 为自定义URI做准备。
DefaultUriBuilderFactory 是 UriBuilderFactory 的默认实现,该实现在内部使用 UriComponentsBuilder
并公开共享的配置选项。
以下示例显示如何配置 RestTemplate:
// import org.springframework.web.util.DefaultUriBuilderFactory.EncodingMode;

String baseUrl = "http://example.org";
DefaultUriBuilderFactory factory = new DefaultUriBuilderFactory(baseUrl);
factory.setEncodingMode(EncodingMode.TEMPLATE_AND_VARIABLES);

RestTemplate restTemplate = new RestTemplate();
restTemplate.setUriTemplateHandler(factory);
下面的示例配置一个 WebClient:
// import org.springframework.web.util.DefaultUriBuilderFactory.EncodingMode;

String baseUrl = "http://example.org";
DefaultUriBuilderFactory factory = new DefaultUriBuilderFactory(baseUrl);
factory.setEncodingMode(EncodingMode.TEMPLATE_AND_VARIABLES);

WebClient client = WebClient.builder().uriBuilderFactory(factory).build();
此外,你也可以直接使用 DefaultUriBuilderFactory。
它类似于使用 UriComponentsBuilder,但不是静态工厂方法,它是一个包含配置和首选项的实际实例,如以下示例所示:
String baseUrl = "http://example.com";
DefaultUriBuilderFactory uriBuilderFactory = new DefaultUriBuilderFactory(baseUrl);

URI uri = uriBuilderFactory.uriString("/hotels/{hotel}")
        .queryParam("q", "{q}")
        .build("Westin", "123");
1.6.3. URI编码
Spring MVC and Spring WebFlux
UriComponentsBuilder 在两个级别公开了编码选项:
-
UriComponentsBuilder#encode(): 首先对URI模板进行预编码,然后在扩展时严格对URI变量进行编码。
-
UriComponents#encode(): 扩展URI变量 后 编码URI组件。
这两个选项都用转义的八位字节替换非ASCII和非法字符。但是,第一个选项还会替换出现在URI变量中的具有保留含义的字符。
| 考虑“;”,这在路径上是合法的,但具有保留的含义。第一个选项将URI变量中“;”替换为“%3B”,但URI模板中的没有。 相比之下,第二个选项永远不会替换“;”,因为它是路径中的合法字符。 |
在大多数情况下,第一个选项可能会产生预期的结果,因为它将URI变量视为要完全编码的不透明数据, 而选项2仅在URI变量有意要包含保留字符的情况下才有用。
以下示例使用第一个选项:
URI uri = UriComponentsBuilder.fromPath("/hotel list/{city}")
            .queryParam("q", "{q}")
            .encode()
            .buildAndExpand("New York", "foo+bar")
            .toUri();

    // Result is "/hotel%20list/New%20York?q=foo%2Bbar"
你可以通过直接传入URI(这意味着编码)来缩短前面的示例,如以下示例所示:
URI uri = UriComponentsBuilder.fromPath("/hotel list/{city}")
            .queryParam("q", "{q}")
            .build("New York", "foo+bar")
你可以使用完整的URI模板进一步缩短它,如以下示例所示:
URI uri = UriComponentsBuilder.fromPath("/hotel list/{city}?q={q}")
            .build("New York", "foo+bar")
WebClient 和 RestTemplate 通过 UriBuilderFactory 策略在内部扩展和编码URI模板。
两者都可以使用自定义策略进行配置。如以下示例所示:
String baseUrl = "http://example.com";
DefaultUriBuilderFactory factory = new DefaultUriBuilderFactory(baseUrl)
factory.setEncodingMode(EncodingMode.TEMPLATE_AND_VALUES);

// Customize the RestTemplate..
RestTemplate restTemplate = new RestTemplate();
restTemplate.setUriTemplateHandler(factory);

// Customize the WebClient..
WebClient client = WebClient.builder().uriBuilderFactory(factory).build();
DefaultUriBuilderFactory 实现在内部使用 UriComponentsBuilder 来扩展和编码URI模板。
作为工厂,它提供了一个位置,可以根据以下一种编码模式来配置编码方法:
-
TEMPLATE_AND_VALUES: 使用UriComponentsBuilder#encode()(对应于先前列表中的第一个选项)对URI模板进行预编码,并在扩展时严格编码URI变量。 -
VALUES_ONLY: 不对URI模板进行编码,而是在将其扩展到模板之前通过UriUtils#encodeUriUriVariables对URI变量进行严格编码。 -
URI_COMPONENTS: 在扩展URI变量之后,使用对应于先前列表中第二个选项的UriComponents#encode()来编码URI组件值。 -
NONE: 不应用编码。
由于历史原因和向后兼容性,将 RestTemplate 设置为 EncodingMode.URI_COMPONENTS。WebClient 依赖于
DefaultUriBuilderFactory 中的默认值,该默认值已从5.0.x中的 EncodingMode.URI_COMPONENTS
更改为5.1中的 EncodingMode.TEMPLATE_AND_VALUES。
1.7. CORS
Spring WebFlux使你可以处理CORS(跨源资源共享)。本节介绍如何执行此操作。
1.7.1. 介绍
出于安全原因,浏览器禁止AJAX调用当前来源以外的资源。 例如,你可以将你的银行帐户放在一个tab中,将evil.com放在另一个tab中。 来自evil.com的脚本不能使用你的凭据向你的银行API发出AJAX请求—例如,从你的帐户中提取资金!
1.7.2. 处理过程
CORS规范分为预检,简单和实际请求。要了解CORS的工作原理,你可以阅读 本文以及其他内容,或者参阅规范以获取更多详细信息。
Spring WebFlux HandlerMapping 实现为CORS提供内置支持。
成功将请求映射到处理程序后,HandlerMapping 将检查给定请求和处理程序的CORS配置,并采取进一步的措施。
预检请求直接处理,而简单和实际的CORS请求被拦截,验证并设置了所需的CORS响应头。
为了启用跨域请求(即存在 Origin 标头,并且与请求的主机不同),你需要具有一些显式声明的CORS配置。
如果找不到匹配的CORS配置,则预检请求将被拒绝。没有将CORS标头添加到简单和实际CORS请求的响应中,因此,浏览器拒绝了它们。
可以使用基于URL模式的 CorsConfiguration 映射分别
配置每个 HandlerMapping。
在大多数情况下,应用程序使用WebFlux Java配置声明此类映射,从而导致将单个全局映射传递给所有 HandlerMapping 实现。
你可以将 HandlerMapping 级别的全局CORS配置与更细粒度的处理程序级别的CORS配置结合使用。
例如,带注解的控制器可以使用类或方法级别的 @CrossOrigin 注解(其他处理程序可以实现 CorsConfigurationSource)。
全局和本地配置组合的规则通常是相加的—例如,所有全局和所有本地origins。对于仅接受单个值的那些属性
(例如: allowCredentials 和 maxAge),局部属性值将覆盖全局值。有关更多详细信息,请参见
CorsConfiguration#combine(CorsConfiguration)。
|
要从源码中了解更多信息或进行高级自定义,请参阅:
|
1.7.3. @CrossOrigin
@CrossOrigin
注解启用带注解的控制器方法上的跨域请求,如以下示例所示:
@RestController
@RequestMapping("/account")
public class AccountController {

    @CrossOrigin
    @GetMapping("/{id}")
    public Mono<Account> retrieve(@PathVariable Long id) {
        // ...
    }

    @DeleteMapping("/{id}")
    public Mono<Void> remove(@PathVariable Long id) {
        // ...
    }
}默认情况下,@CrossOrigin 允许:
-
所有源。
-
所有头。
-
控制器方法映射到的所有HTTP方法。
默认情况下,allowedCredentials 未启用,因为它建立了一个信任级别,可以公开敏感的用户特定信息
(例如:cookie和CSRF tokens),并且仅在适当的地方使用。
maxAge 设置为30分钟。
@CrossOrigin 在类级别上也受支持,并且被所有方法继承。以下示例指定了一个特定域,并将 maxAge 设置为一个小时:
@CrossOrigin(origins = "http://domain2.com", maxAge = 3600)
@RestController
@RequestMapping("/account")
public class AccountController {

    @GetMapping("/{id}")
    public Mono<Account> retrieve(@PathVariable Long id) {
        // ...
    }

    @DeleteMapping("/{id}")
    public Mono<Void> remove(@PathVariable Long id) {
        // ...
    }
}
你可以在类和方法级别使用 @CrossOrigin,如以下示例所示:
@CrossOrigin(maxAge = 3600) (1)
@RestController
@RequestMapping("/account")
public class AccountController {

    @CrossOrigin("http://domain2.com") (2)
    @GetMapping("/{id}")
    public Mono<Account> retrieve(@PathVariable Long id) {
        // ...
    }

    @DeleteMapping("/{id}")
    public Mono<Void> remove(@PathVariable Long id) {
        // ...
    }
}| 1 | 在类级别使用 @CrossOrigin。 |
| 2 | 在方法级别使用 @CrossOrigin。 |
1.7.4. 全局配置
除了细粒度的控制器方法级配置外,你可能还想定义一些全局CORS配置。
你可以在任何 HandlerMapping 上分别设置基于URL的 CorsConfiguration 映射。
但是,大多数应用程序都使用WebFlux Java配置来执行此操作。
默认情况下,全局配置启用以下功能:
-
所有源。
-
所有头。
-
GET,HEAD和POST方法。
默认情况下,allowedCredentials 未启用,因为它建立了一个信任级别,可以公开敏感的用户特定信息
(例如:cookie和CSRF tokens),并且仅在适当的地方使用。
maxAge 设置为30分钟。
要在WebFlux Java配置中启用CORS,可以使用 CorsRegistry 回调,如以下示例所示:
@Configuration
@EnableWebFlux
public class WebConfig implements WebFluxConfigurer {

    @Override
    public void addCorsMappings(CorsRegistry registry) {

        registry.addMapping("/api/**")
            .allowedOrigins("http://domain2.com")
            .allowedMethods("PUT", "DELETE")
            .allowedHeaders("header1", "header2", "header3")
            .exposedHeaders("header1", "header2")
            .allowCredentials(true).maxAge(3600);

        // Add more mappings...
    }
}
1.7.5. CORS WebFilter
你可以通过内置的 CorsWebFilter
应用CORS支持,该功能非常适合函数式端点。
如果你尝试将 CorsFilter 与Spring Security一起使用,请记住Spring Security 内置了对CORS的支持。
|
要配置过滤器,可以声明一个 CorsWebFilter bean并将 CorsConfigurationSource 传递给其构造函数,如以下示例所示:
@Bean
CorsWebFilter corsFilter() {

    CorsConfiguration config = new CorsConfiguration();

    // Possibly...
    // config.applyPermitDefaultValues()

    config.setAllowCredentials(true);
    config.addAllowedOrigin("http://domain1.com");
    config.addAllowedHeader("*");
    config.addAllowedMethod("*");

    UrlBasedCorsConfigurationSource source = new UrlBasedCorsConfigurationSource();
    source.registerCorsConfiguration("/**", config);

    return new CorsWebFilter(source);
}
1.8. Web安全
Spring Security 项目提供了保护Web应用程序免受恶意利用的支持。请参阅Spring Security参考文档,包括:
1.9. 视图技术
Spring WebFlux中视图技术的使用是可插拔的。是否决定使用Thymeleaf,FreeMarker或其他某种视图技术主要取决于配置更改。 本章介绍了与Spring WebFlux集成的视图技术。我们假设你已经熟悉视图解析。
1.9.1. Thymeleaf
Thymeleaf是一种现代的服务器端Java模板引擎,它强调可以通过双击在浏览器中预览自然HTML模板, 这对于独立处理UI模板(例如,由设计人员)而无需使用正在运行的服务器非常有用。 Thymeleaf提供了广泛的功能集,并且正在积极地开发和维护。有关更完整的介绍,请参见 Thymeleaf项目主页。
Thymeleaf与Spring WebFlux的集成由Thymeleaf项目管理。该配置涉及一些bean声明,例如:
SpringResourceTemplateResolver,SpringWebFluxTemplateEngine 和 ThymeleafReactiveViewResolver。
有关更多详细信息,请参见 Thymeleaf+Spring和
WebFlux集成 公告。
1.9.2. FreeMarker
Apache FreeMarker是一个模板引擎,用于生成从HTML到电子邮件等的任何类型的文本输出。 Spring框架具有内置的集成,可以将Spring WebFlux与FreeMarker模板一起使用。
视图配置
以下示例显示如何将FreeMarker配置作为一种视图技术:
@Configuration
@EnableWebFlux
public class WebConfig implements WebFluxConfigurer {

    @Override
    public void configureViewResolvers(ViewResolverRegistry registry) {
        registry.freemarker();
    }

    // Configure FreeMarker...

    @Bean
    public FreeMarkerConfigurer freeMarkerConfigurer() {
        FreeMarkerConfigurer configurer = new FreeMarkerConfigurer();
        configurer.setTemplateLoaderPath("classpath:/templates");
        return configurer;
    }
}
你的模板需要存储在 FreeMarkerConfigurer 指定的目录中,如上例所示。给定上述配置,如果你的控制器返回视图名称 welcome,
则解析器将查找 classpath:/templates/freemarker/welcome.ftl 模板。
FreeMarker配置
你可以通过在 FreeMarkerConfigurer bean上设置适当的bean属性,
将FreeMarker的“Settings”和“SharedVariables”直接传递给FreeMarker Configuration 对象(由Spring管理)。
freemarkerSettings 属性需要一个 java.util.Properties 对象,而 freemarkerVariables 属性需要一个 java.util.Map。
以下示例显示了如何使用 FreeMarkerConfigurer:
@Configuration
@EnableWebFlux
public class WebConfig implements WebFluxConfigurer {

    // ...

    @Bean
    public FreeMarkerConfigurer freeMarkerConfigurer() {
        Map<String, Object> variables = new HashMap<>();
        variables.put("xml_escape", new XmlEscape());

        FreeMarkerConfigurer configurer = new FreeMarkerConfigurer();
        configurer.setTemplateLoaderPath("classpath:/templates");
        configurer.setFreemarkerVariables(variables);
        return configurer;
    }
}
有关将settings和variables应用于 Configuration 对象的详细信息,请参见FreeMarker文档。
表单处理
Spring提供了一个供JSP使用的标签库,其中包含一个 <spring:bind/> 元素。该元素主要允许表单显示来自表单支持对象的值,
并显示来自Web或业务层中 Validator 的验证失败的结果。Spring还支持FreeMarker中的相同功能,并带有用于生成表单输入元素本身的附加便利宏。
绑定宏
FreeMarker的 spring-webflux.jar 文件中维护了一组标准宏,因此它们始终可用于经过适当配置的应用程序。
Spring模板库中定义的某些宏被视为内部(私有)宏,但是在宏定义中不存在这种作用域,这使得所有宏对于调用代码和用户模板都是可见的。
以下各节仅关注你需要在模板中直接调用的宏。如果你希望直接查看宏代码,则该文件名为 spring.ftl,位于
org.springframework.web.reactive.result.view.freemarker 包中。
有关绑定支持的更多详细信息,请参见Spring MVC的 简单绑定。
1.9.3. 脚本视图
Spring框架具有内置的集成,可以将Spring WebFlux与可以在 JSR-223 Java脚本引擎之上运行的任何模板库一起使用。下表显示了我们在不同脚本引擎上测试过的模板库:
| 脚本库 | 脚本引擎 |
|---|---|
集成任何其他脚本引擎的基本规则是,它必须实现 ScriptEngine 和 Invocable 接口。
|
要求
你需要在类路径上具有脚本引擎,其细节因脚本引擎而异:
-
Java 8+随附了 Nashorn JavaScript引擎。强烈建议使用可用的最新release版本。
-
应该将 JRuby添加为对Ruby支持的依赖。
-
应该将 Jython添加为对Python支持的依赖。
-
应该添加
org.jetbrains.kotlin:kotlin-script-util依赖和包含org.jetbrains.kotlin.script.jsr223.KotlinJsr223JvmLocalScriptEngineFactory行的META-INF/services/javax.script.ScriptEngineFactory文件。有关更多详细信息,请参见 此示例。
你需要具有脚本模板库。针对Javascript的一种方法是通过 WebJars。
脚本模板
你可以声明一个 ScriptTemplateConfigurer bean来指定要使用的脚本引擎,要加载的脚本文件,
要调用什么函数来渲染模板等等。以下示例使用Mustache模板和Nashorn JavaScript引擎:
@Configuration
@EnableWebFlux
public class WebConfig implements WebFluxConfigurer {

    @Override
    public void configureViewResolvers(ViewResolverRegistry registry) {
        registry.scriptTemplate();
    }

    @Bean
    public ScriptTemplateConfigurer configurer() {
        ScriptTemplateConfigurer configurer = new ScriptTemplateConfigurer();
        configurer.setEngineName("nashorn");
        configurer.setScripts("mustache.js");
        configurer.setRenderObject("Mustache");
        configurer.setRenderFunction("render");
        return configurer;
    }
}
使用以下参数调用 render 函数:
-
String template: 模板内容 -
Map model: 视图模型 -
RenderingContext renderingContext:RenderingContext用于访问应用程序上下文,语言环境,模板加载器和URL(从5.0开始)
Mustache.render() 与该签名本地兼容,所以你可以直接调用它。
如果你的模板技术需要一些自定义,则可以提供一个实现自定义渲染函数的脚本。 例如, Handlerbars需要在使用模板之前先对其进行编译, 并且需要使用 polyfill来模拟服务器端脚本引擎中不可用的某些浏览器功能。 以下示例显示如何设置自定义渲染函数:
@Configuration
@EnableWebMvc
public class WebConfig implements WebFluxConfigurer {

    @Override
    public void configureViewResolvers(ViewResolverRegistry registry) {
        registry.scriptTemplate();
    }

    @Bean
    public ScriptTemplateConfigurer configurer() {
        ScriptTemplateConfigurer configurer = new ScriptTemplateConfigurer();
        configurer.setEngineName("nashorn");
        configurer.setScripts("polyfill.js", "handlebars.js", "render.js");
        configurer.setRenderFunction("render");
        configurer.setSharedEngine(false);
        return configurer;
    }
}
当使用非线程安全脚本引擎和非并发设计的模板库时,需要将 sharedEngine 属性设置为 false,
例如:Nashorn上运行的Handlebars或React。在这种情况下,由于
此bug,需要Java 8u60或更高版本,
但通常建议在任何情况下都使用最新的Java SE修补程序版本。
|
polyfill.js 只定义了Handlebars正常运行所需要的 window 对象,如下面的代码片段所示:
var window = {};这个基本的 render.js 实现在使用模板之前先对其进行编译。生产就绪的实现还应该存储和重用缓存的模板或预编译的模板。
这可以在脚本端以及你需要的任何自定义(例如,管理模板引擎配置)上完成。以下示例显示了如何编译模板:
function render(template, model) {
    var compiledTemplate = Handlebars.compile(template);
    return compiledTemplate(model);
}1.9.4. JSON和XML
出于内容协商的目的,根据客户端请求的内容类型,能够在使用HTML模板呈现模型和以其他格式(如JSON或XML)呈现模型之间进行切换是很有用的。
为了支持此操作,Spring WebFlux提供了 HttpMessageWriterView,你可以使用它插入 spring-web 中的任何可用编解码器,
例如:Jackson2JsonEncoder,Jackson2SmileEncoder 或 Jaxb2XmlEncoder。
与其他视图技术不同,HttpMessageWriterView 不需要 ViewResolver,而是配置为默认视图。
你可以配置一个或多个此类默认视图,并包装不同的 HttpMessageWriter 实例或 Encoder 实例。
与请求的内容类型相匹配的内容类型在运行时使用。
在大多数情况下,模型包含多个属性。要确定要序列化的对象,可以使用模型属性的名称配置 HttpMessageWriterView 进行渲染。如果模型仅包含一个属性,则使用该属性。
1.10. HTTP缓存
HTTP缓存可以显著提高Web应用程序的性能。HTTP缓存围绕 Cache-Control 响应头和后续的条件请求头,
如 Last-Modified 和 ETag 进行。Cache-Control 建议私有(例如浏览器)和公共(例如代理)缓存如何缓存和重用响应。
ETag 标头用于发出条件请求,如果内容未更改,则可能导致返回没有响应体的304(NOT_MODIFIED)状态。
ETag 可以看作是 Last-Modified 头的更复杂后继者。
本节介绍了Spring WebFlux中与HTTP缓存相关的选项。
1.10.1. CacheControl
CacheControl
支持配置与 Cache-Control 标头相关的设置,并在许多地方作为参数被接受:
尽管 RFC 7234描述了
Cache-Control 响应头的所有可能的指令,但 CacheControl 类型采用了面向用例的方法,着重于常见场景:
// Cache for an hour - "Cache-Control: max-age=3600"
CacheControl ccCacheOneHour = CacheControl.maxAge(1, TimeUnit.HOURS);

// Prevent caching - "Cache-Control: no-store"
CacheControl ccNoStore = CacheControl.noStore();

// Cache for ten days in public and private caches,
// public caches should not transform the response
// "Cache-Control: max-age=864000, public, no-transform"
CacheControl ccCustom = CacheControl.maxAge(10, TimeUnit.DAYS).noTransform().cachePublic();
1.10.2. 控制器
控制器可以添加对HTTP缓存的显式支持。
我们建议你这样做,因为需要先计算资源的 lastModified 或 ETag 值,然后才能将其与条件请求头进行比较。
控制器可以将 ETag 和 Cache-Control 设置添加到 ResponseEntity,如以下示例所示:
@GetMapping("/book/{id}")
public ResponseEntity<Book> showBook(@PathVariable Long id) {

    Book book = findBook(id);
    String version = book.getVersion();

    return ResponseEntity
            .ok()
            .cacheControl(CacheControl.maxAge(30, TimeUnit.DAYS))
            .eTag(version) // lastModified is also available
            .body(book);
}
如果与条件请求头的比较表明内容未更改,则前面的示例发送带有空主体的304(NOT_MODIFIED)响应。
否则,ETag 和 Cache-Control 标头将添加到响应中。
你还可以在控制器中针对条件请求头进行检查,如以下示例所示:
@RequestMapping
public String myHandleMethod(ServerWebExchange exchange, Model model) {

    long eTag = ... (1)

    if (exchange.checkNotModified(eTag)) {
        return null; (2)
    }

    model.addAttribute(...); (3)
    return "myViewName";
}| 1 | 特定于应用程序的计算。 |
| 2 | 响应已设置为304(NOT_MODIFIED)。无需进一步处理。 |
| 3 | 继续进行请求处理。 |
可以使用三种变体来检查针对 eTag 值,lastModified 值或混合两者的条件请求。
对于有条件的 GET 和 HEAD 请求,可以将响应设置为304(NOT_MODIFIED)。
对于条件 POST,PUT 和 DELETE,你可以将响应设置为409(PRECONDITION_FAILED),以防止并发修改。
1.11. WebFlux配置
WebFlux Java配置声明使用带注解的控制器或函数式端点来声明处理请求所必需的组件,并且它提供了用于自定义配置的API。
这意味着你不需要了解Java配置创建的基础bean。但是,如果你想了解它们,则可以在 WebFluxConfigurationSupport
中查看它们,或阅读有关特殊Bean类型中的更多信息。
对于配置API中没有的更高级的自定义设置,你可以通过高级配置模式完全控制配置。
1.11.1. 启用WebFlux配置
你可以在Java配置中使用 @EnableWebFlux 注解,如以下示例所示:
@Configuration
@EnableWebFlux
public class WebConfig {
}
前面的示例注册了许多Spring WebFlux基础设施Bean, 并适配了classpath上可用的依赖项—对于JSON,XML等。
1.11.2. WebFlux配置API
在Java配置中,可以实现 WebFluxConfigurer 接口,如以下示例所示:
@Configuration
@EnableWebFlux
public class WebConfig implements WebFluxConfigurer {

    // Implement configuration methods...

}
1.11.3. 转换,格式化
默认情况下,将安装 Number 和 Date 类型的格式化程序,包括对 @NumberFormat 和 @DateTimeFormat 注解的支持。
如果类路径中存在Joda-Time,则还将安装对Joda-Time格式库的完全支持。
下面的示例演示如何注册自定义格式化器和转换器:
@Configuration
@EnableWebFlux
public class WebConfig implements WebFluxConfigurer {

    @Override
    public void addFormatters(FormatterRegistry registry) {
        // ...
    }

}
有关何时使用 FormatterRegistrar 实现的更多信息,请参见
FormatterRegistrar SPI和
FormattingConversionServiceFactoryBean。
|
1.11.4. 检验
默认情况下,如果 Bean验证存在于类路径中
(例如:Hibernate Validator),则 LocalValidatorFactoryBean 将注册为全局
验证器,以与 @Valid 和 @Controller 方法参数中的 Validated 一起使用。
在Java配置中,你可以自定义全局 Validator 实例,如以下示例所示:
@Configuration
@EnableWebFlux
public class WebConfig implements WebFluxConfigurer {

    @Override
    public Validator getValidator(); {
        // ...
    }

}
请注意,你还可以在本地注册 Validator 实现,如以下示例所示:
@Controller
public class MyController {

    @InitBinder
    protected void initBinder(WebDataBinder binder) {
        binder.addValidators(new FooValidator());
    }

}
如果需要在某处注入 LocalValidatorFactoryBean,请创建一个bean并用 @Primary 进行注解,以避免与MVC配置中声明的bean发生冲突。
|
1.11.5. 内容类型解析器
你可以配置Spring WebFlux如何根据请求为 @Controller 实例确定所请求的媒体类型。
默认情况下,仅选中 Accept 标头,但你也可以启用基于查询参数的策略。
以下示例显示如何自定义请求的内容类型解析:
@Configuration
@EnableWebFlux
public class WebConfig implements WebFluxConfigurer {

    @Override
    public void configureContentTypeResolver(RequestedContentTypeResolverBuilder builder) {
        // ...
    }
}
1.11.6. HTTP消息编解码器
以下示例显示如何自定义读取请求体和写入响应体的方式:
@Configuration
@EnableWebFlux
public class WebConfig implements WebFluxConfigurer {

    @Override
    public void configureHttpMessageCodecs(ServerCodecConfigurer configurer) {
        // ...
    }
}
ServerCodecConfigurer 提供了一组默认的读取器和写入器。你可以使用它来添加更多的读取器和写入器,
自定义默认的读取器或完全替换默认的读取器和写入器。
对于Jackson JSON和XML,请考虑使用
Jackson2ObjectMapperBuilder,
该工具使用以下属性自定义Jackson的默认属性:
如果在类路径中检测到以下知名模块,它还将自动注册以下知名模块:
-
jackson-datatype-joda: 支持Joda-Time类型。 -
jackson-datatype-jsr310: 支持Java 8日期和时间API类型。 -
jackson-datatype-jdk8: 支持其他Java 8类型,例如Optional。 -
jackson-module-kotlin: 支持Kotlin类和数据类。
1.11.7. 视图解析器
下面的示例显示如何配置视图解析器:
@Configuration
@EnableWebFlux
public class WebConfig implements WebFluxConfigurer {

    @Override
    public void configureViewResolvers(ViewResolverRegistry registry) {
        // ...
    }
}
ViewResolverRegistry 具有与Spring Framework集成的视图技术的快捷方式。
以下示例使用FreeMarker(这也需要配置基础FreeMarker视图技术):
@Configuration
@EnableWebFlux
public class WebConfig implements WebFluxConfigurer {


    @Override
    public void configureViewResolvers(ViewResolverRegistry registry) {
        registry.freeMarker();
    }

    // Configure Freemarker...

    @Bean
    public FreeMarkerConfigurer freeMarkerConfigurer() {
        FreeMarkerConfigurer configurer = new FreeMarkerConfigurer();
        configurer.setTemplateLoaderPath("classpath:/templates");
        return configurer;
    }
}
你还可以插入任何 ViewResolver 实现,如以下示例所示:
@Configuration
@EnableWebFlux
public class WebConfig implements WebFluxConfigurer {


    @Override
    public void configureViewResolvers(ViewResolverRegistry registry) {
        ViewResolver resolver = ... ;
        registry.viewResolver(resolver);
    }
}为了支持内容协商并通过视图解析(HTML之外)渲染其他格式,
你可以基于 HttpMessageWriterView 实现配置一个或多个默认视图,该实现接受 spring-web 中的任何可用编解码器。
以下示例显示了如何执行此操作:
@Configuration
@EnableWebFlux
public class WebConfig implements WebFluxConfigurer {


    @Override
    public void configureViewResolvers(ViewResolverRegistry registry) {
        registry.freeMarker();

        Jackson2JsonEncoder encoder = new Jackson2JsonEncoder();
        registry.defaultViews(new HttpMessageWriterView(encoder));
    }

    // ...
}
有关与Spring WebFlux集成的视图技术的更多信息,请参见视图技术。
1.11.8. 静态资源
此选项提供了一种方便的方法来从基于 Resource的位置列表中提供静态资源。
在下一个示例中,给定一个以 /resources 开头的请求,相对路径用于在类路径上查找和提供相对于 /static 的静态资源。
资源的有效期为一年,以确保最大程度地利用浏览器缓存并减少浏览器发出的HTTP请求。
还评估 Last-Modified 头,如果存在,则返回304状态码。以下列表显示了示例:
@Configuration
@EnableWebFlux
public class WebConfig implements WebFluxConfigurer {

    @Override
    public void addResourceHandlers(ResourceHandlerRegistry registry) {
        registry.addResourceHandler("/resources/**")
            .addResourceLocations("/public", "classpath:/static/")
            .setCacheControl(CacheControl.maxAge(365, TimeUnit.DAYS));
    }

}
资源处理程序还支持一系列
ResourceResolver实现和
ResourceTransformer实现,
可用于创建用于处理优化资源的工具链。
你可以根据从内容,固定应用程序版本或其他信息计算出的MD5哈希,将 VersionResourceResolver 用于版本化的资源URL。
ContentVersionStrategy(MD5哈希)是一个不错的选择,但有一些值得注意的例外(例如:与模块加载器一起使用的JavaScript资源)。
以下示例显示如何在Java配置中使用 VersionResourceResolver:
@Configuration
@EnableWebFlux
public class WebConfig implements WebFluxConfigurer {

    @Override
    public void addResourceHandlers(ResourceHandlerRegistry registry) {
        registry.addResourceHandler("/resources/**")
                .addResourceLocations("/public/")
                .resourceChain(true)
                .addResolver(new VersionResourceResolver().addContentVersionStrategy("/**"));
    }

}
你可以使用 ResourceUrlProvider 重写URL并应用完整的解析器和转换器链(例如:插入版本)。
WebFlux配置提供了 ResourceUrlProvider,以便可以将其注入其他资源。
与Spring MVC不同,目前,在WebFlux中,由于没有视图技术可以利用解析器和转换器的非阻塞链,
因此无法透明地重写静态资源URL。当仅提供本地资源时,解决方法是直接使用 ResourceUrlProvider(例如:通过自定义元素)并进行阻止。
请注意,在同时使用 EncodedResourceResolver(例如:Gzip,Brotli编码)和 VersionedResourceResolver
时,必须按该顺序注册,以确保始终基于未编码文件可靠地计算基于内容的版本。
WebJars 还通过 WebJarsResourceResolver 支持,当
org.webjars:webjars-locator-core 库存在于类路径中时,WebJars将自动注册。
解析程序可以重写URL以包括jar的版本,并且还可以与没有版本的传入URL进行匹配(例如:从 /jquery/jquery.min.js
到 /jquery/1.2.0/jquery.min.js)。
1.11.9. 路径匹配
你可以自定义与路径匹配有关的选项。有关各个选项的详细信息,请参见
PathMatchConfigurer javadoc。
以下示例显示如何使用 PathMatchConfigurer:
@Configuration
@EnableWebFlux
public class WebConfig implements WebFluxConfigurer {

    @Override
    public void configurePathMatch(PathMatchConfigurer configurer) {
        configurer
            .setUseCaseSensitiveMatch(true)
            .setUseTrailingSlashMatch(false)
            .addPathPrefix("/api",
                    HandlerTypePredicate.forAnnotation(RestController.class));
    }

}|
Spring WebFlux依赖于请求路径的解析表示形式来访问解码的路径段值,该请求路径称为 Spring WebFlux还不支持后缀模式匹配,这与Spring MVC不同,在Spring MVC中,我们也 建议不要依赖它。 |
1.11.10. 高级配置模式
@EnableWebFlux 导入 DelegatingWebFluxConfiguration :
-
为WebFlux应用程序提供默认的Spring配置
-
检测并委托给
WebFluxConfigurer实现以自定义该配置。
对于高级模式,你可以删除 @EnableWebFlux 并直接从 DelegatingWebFluxConfiguration
继承而不是实现 WebFluxConfigurer,如以下示例所示:
@Configuration
public class WebConfig extends DelegatingWebFluxConfiguration {

    // ...

}
你可以将现有方法保留在 WebConfig 中,但是现在你还可以覆盖基类中的bean声明,
并且在类路径上仍然具有任意数量的其他 WebMvcConfigurer 实现。
1.12. HTTP/2
Servlet 4容器需要支持HTTP/2,并且Spring Framework 5与Servlet API 4兼容。 从编程模型的角度来看,应用程序不需要做任何特定的事情。但是,有一些与服务器配置有关的注意事项。 有关更多详细信息,请参见 HTTP/2 Wiki页面。
当前,Spring WebFlux不支持Netty的HTTP/2。也没有支持以编程方式将资源推送到客户端。
2. WebClient
Spring WebFlux包括用于HTTP请求的响应式,非阻塞 WebClient。客户端具有函数式,流利的API,
具有用于声明式组合的响应式类型,请参见 响应式类库。
WebFlux客户端和服务器依靠相同的非阻塞编解码器对请求和响应内容进行编码和解码。
WebClient 在内部委托给HTTP客户端库。默认情况下,它使用 Reactor Netty,
内置了对Jetty 响应式HttpClient的支持,其
他的则可以通过 ClientHttpConnector 插入。
2.1. 配置
创建 WebClient 的最简单方法是通过静态工厂方法之一:
-
WebClient.create() -
WebClient.create(String baseUrl)
上面的方法使用默认设置的Reactor Netty HttpClient,并期望 io.projectreactor.netty:reactor-netty 位于类路径上。
你还可以将 WebClient.builder() 与其他选项一起使用:
-
uriBuilderFactory: 自定义的UriBuilderFactory用作基本URL。 -
defaultHeader: 每个请求的头部。 -
defaultCookie: 每个请求的Cookie。 -
defaultRequest:Consumer可以定制每个请求。 -
filter: 每个请求的客户端过滤器。 -
exchangeStrategies: HTTP消息读取器/写入器定制。 -
clientConnector: HTTP客户端库设置。
以下示例配置HTTP编解码器:
    WebClient client = WebClient.builder()
          .exchangeStrategies(builder -> {
                  return builder.codecs(codecConfigurer -> {
                      //...
                  });
          })
.build();构建后,WebClient 实例是不可变的。但是,你可以克隆它并构建修改后的副本,而不会影响原始实例,如以下示例所示:
    WebClient client1 = WebClient.builder()
            .filter(filterA).filter(filterB).build();

    WebClient client2 = client1.mutate()
            .filter(filterC).filter(filterD).build();

    // client1 has filterA, filterB

    // client2 has filterA, filterB, filterC, filterD
2.1.1. MaxInMemorySize
Spring WebFlux配置了在编解码器中缓冲内存中数据的限制,以避免应用程序内存问题。默认情况下,此配置为256KB, 如果这不足以满足你的用例,你将看到以下内容:
org.springframework.core.io.buffer.DataBufferLimitException: Exceeded limit on max bytes to buffer你可以使用以下代码示例在所有默认编解码器上配置此限制:
    WebClient webClient = WebClient.builder()
          .exchangeStrategies(builder ->
              builder.codecs(codecs ->
                  codecs.defaultCodecs().maxInMemorySize(2 * 1024 * 1024)
              )
          )
          .build();
2.1.2. Reactor Netty
要自定义Reactor Netty设置,只需提供一个预先配置的 HttpClient:
    HttpClient httpClient = HttpClient.create().secure(sslSpec -> ...);

    WebClient webClient = WebClient.builder()
            .clientConnector(new ReactorClientHttpConnector(httpClient))
            .build();
资源
默认情况下,HttpClient 会参与 reactor.netty.http.HttpResources 中包含的全局Reactor Netty资源,
包括事件循环线程和连接池。这是推荐的模式,因为固定的共享资源是事件循环并发的首选。在这种模式下,全局资源将保持活动状态,直到进程退出。
如果服务器与进程同步,通常不需要显式关闭。但是,如果服务器可以启动或停止进程内(例如:部署为WAR的Spring MVC应用程序),
则可以声明类型为 ReactorResourceFactory 的Spring托管Bean,其中 globalResources=true(默认值)以确保
Reactor关闭Spring ApplicationContext 时,将关闭Netty全局资源,如以下示例所示:
    @Bean
    public ReactorResourceFactory reactorResourceFactory() {
        return new ReactorResourceFactory();
    }
你也可以选择不参与全局Reactor Netty资源。但是,在这种模式下,确保所有Reactor Netty客户端和服务器实例使用共享资源是你的重担,如以下示例所示:
    @Bean
    public ReactorResourceFactory resourceFactory() {
        ReactorResourceFactory factory = new ReactorResourceFactory();
        factory.setGlobalResources(false); (1)
        return factory;
    }

    @Bean
    public WebClient webClient() {

        Function<HttpClient, HttpClient> mapper = client -> {
            // Further customizations...
        };

        ClientHttpConnector connector =
                new ReactorClientHttpConnector(resourceFactory(), mapper); (2)

        return WebClient.builder().clientConnector(connector).build(); (3)
}| 1 | 创建独立于全局资源的资源。 |
| 2 | 将 ReactorClientHttpConnector 构造函数与资源工厂一起使用。 |
| 3 | 将连接器插入 WebClient.Builder。 |
超时
要配置连接超时:
import io.netty.channel.ChannelOption;

HttpClient httpClient = HttpClient.create()
        .tcpConfiguration(client ->
                client.option(ChannelOption.CONNECT_TIMEOUT_MILLIS, 10000));
要配置读取和/或写入超时值:
import io.netty.handler.timeout.ReadTimeoutHandler;
import io.netty.handler.timeout.WriteTimeoutHandler;

HttpClient httpClient = HttpClient.create()
        .tcpConfiguration(client ->
                client.doOnConnected(conn -> conn
                        .addHandlerLast(new ReadTimeoutHandler(10))
                        .addHandlerLast(new WriteTimeoutHandler(10))));
2.1.3. Jetty
以下示例显示如何自定义Jetty HttpClient 设置:
    HttpClient httpClient = new HttpClient();
    httpClient.setCookieStore(...);
    ClientHttpConnector connector = new JettyClientHttpConnector(httpClient);

WebClient webClient = WebClient.builder().clientConnector(connector).build();默认情况下,HttpClient 创建自己的资源(Executor, ByteBufferPool, Scheduler),这些资源将保持活动状态,
直到进程退出或调用 stop() 为止。
你可以在Jetty客户端(和服务器)的多个实例之间共享资源,并通过声明 JettyResourceFactory
类型的Spring托管bean来确保在关闭Spring ApplicationContext 时关闭资源,如以下示例所示:
    @Bean
    public JettyResourceFactory resourceFactory() {
        return new JettyResourceFactory();
    }

    @Bean
    public WebClient webClient() {

        HttpClient httpClient = new HttpClient();
        // Further customizations...

        ClientHttpConnector connector =
                new JettyClientHttpConnector(httpClient, resourceFactory());(1)

        return WebClient.builder().clientConnector(connector).build();(2)
}| 1 | 将 JettyClientHttpConnector 构造函数与资源工厂一起使用。 |
| 2 | 将连接器插入 WebClient.Builder。 |
2.2. retrieve()
retrieve() 方法是获取响应体并将其解码的最简单方法。以下示例显示了如何执行此操作:
    WebClient client = WebClient.create("http://example.org");

    Mono<Person> result = client.get()
            .uri("/persons/{id}", id).accept(MediaType.APPLICATION_JSON)
            .retrieve()
            .bodyToMono(Person.class);
你还可以从响应中解码出一个对象流,如以下示例所示:
    Flux<Quote> result = client.get()
            .uri("/quotes").accept(MediaType.TEXT_EVENT_STREAM)
            .retrieve()
            .bodyToFlux(Quote.class);
默认情况下,具有4xx或5xx状态码的响应会导致 WebClientResponseException 或其HTTP状态特定的子类之一,
例如:WebClientResponseException.BadRequest,WebClientResponseException.NotFound 等。
你还可以使用 onStatus 方法来自定义结果异常,如以下示例所示:
    Mono<Person> result = client.get()
            .uri("/persons/{id}", id).accept(MediaType.APPLICATION_JSON)
            .retrieve()
            .onStatus(HttpStatus::is4xxServerError, response -> ...)
            .onStatus(HttpStatus::is5xxServerError, response -> ...)
            .bodyToMono(Person.class);
使用 onStatus 时,如果期望响应包含内容,则 onStatus 回调应使用它。否则,内容将自动耗尽以确保释放资源。
2.3. exchange()
与 retrieve 方法相比,exchange() 方法提供了更多的控制。以下示例等效于 retrieve(),但也提供了对 ClientResponse 的访问:
    Mono<Person> result = client.get()
            .uri("/persons/{id}", id).accept(MediaType.APPLICATION_JSON)
            .exchange()
            .flatMap(response -> response.bodyToMono(Person.class));
在此级别,你还可以创建完整的 ResponseEntity:
    Mono<ResponseEntity<Person>> result = client.get()
            .uri("/persons/{id}", id).accept(MediaType.APPLICATION_JSON)
            .exchange()
            .flatMap(response -> response.toEntity(Person.class));
注意(与 retrieve() 不同),对于 exchange(),没有针对4xx和5xx响应的自动错误信号。你必须检查状态码并决定如何处理。
CAUTION:
使用 exchange() 时,即使在发生异常时,也必须确保主体始终被消耗或释放(请参阅
使用DataBuffer)。
通常,你可以通过在 ClientResponse 上调用 bodyTo* 或 toEntity* 来将主体转换为所需类型的对象来执行此操作,
但是你也可以调用 releaseBody() 来丢弃主体内容而不使用它,或者可以调用 toBodilessEntity() 来获取主体状态和标头(同时丢弃正文)。
最后,有 bodyToMono(Void.class),仅在没有响应内容的情况下才应使用。如果响应中确实包含内容,则该连接将关闭并且不会放回池中,因为该连接不会处于可重用状态。
2.4. 请求体
可以使用 ReactiveAdapterRegistry 处理的任何异步类型对请求体进行编码,例如:Mono 或Kotlin Coroutines的 Deferred,如以下示例所示:
    Mono<Person> personMono = ... ;

    Mono<Void> result = client.post()
            .uri("/persons/{id}", id)
            .contentType(MediaType.APPLICATION_JSON)
            .body(personMono, Person.class)
            .retrieve()
            .bodyToMono(Void.class);
你还可以对对象流进行编码,如以下示例所示:
    Flux<Person> personFlux = ... ;

    Mono<Void> result = client.post()
            .uri("/persons/{id}", id)
            .contentType(MediaType.APPLICATION_STREAM_JSON)
            .body(personFlux, Person.class)
            .retrieve()
            .bodyToMono(Void.class);
另外,如果你具有实际值,则可以使用 bodyValue 快捷方式,如以下示例所示:
    Person person = ... ;

    Mono<Void> result = client.post()
            .uri("/persons/{id}", id)
            .contentType(MediaType.APPLICATION_JSON)
            .bodyValue(person)
            .retrieve()
            .bodyToMono(Void.class);
2.4.1. 表单数据
要发送表单数据,可以提供 MultiValueMap<String, String> 作为正文。
请注意,内容由 FormHttpMessageWriter 自动设置为 application/x-www-form-urlencoded。
下面的示例演示如何使用 MultiValueMap<String, String>:
    MultiValueMap<String, String> formData = ... ;

    Mono<Void> result = client.post()
            .uri("/path", id)
            .bodyValue(formData)
            .retrieve()
            .bodyToMono(Void.class);
你还可以使用 BodyInserters 内联提供表单数据,如以下示例所示:
    import static org.springframework.web.reactive.function.BodyInserters.*;

    Mono<Void> result = client.post()
            .uri("/path", id)
            .body(fromFormData("k1", "v1").with("k2", "v2"))
            .retrieve()
            .bodyToMono(Void.class);
2.4.2. Multipart数据
要发送multipart数据,你需要提供一个 MultiValueMap<String, ?>,其值可以是代表part内容的对象实例或代表part内容和标头的 HttpEntity 实例。
MultipartBodyBuilder 提供了一个方便的API来准备multipart请求。下面的示例演示如何创建 MultiValueMap<String, ?>:
    MultipartBodyBuilder builder = new MultipartBodyBuilder();
    builder.part("fieldPart", "fieldValue");
    builder.part("filePart", new FileSystemResource("...logo.png"));
    builder.part("jsonPart", new Person("Jason"));

    MultiValueMap<String, HttpEntity<?>> parts = builder.build();
在大多数情况下,你不必为每个part指定 Content-Type。内容类型是根据选择用于对其进行序列化的 HttpMessageWriter 自动确定的,
对于 Resource 而言,取决于文件扩展名。如有必要,你可以通过重载的构建器 part 方法之一显式提供 MediaType 以供每个part使用。
准备好 MultiValueMap 之后,将其传递给 WebClient 的最简单方法是通过 body 方法,如以下示例所示:
    MultipartBodyBuilder builder = ...;

    Mono<Void> result = client.post()
            .uri("/path", id)
            .body(builder.build())
            .retrieve()
            .bodyToMono(Void.class);
如果 MultiValueMap 包含至少一个非 String 值,该值也可以表示常规表单数据(即 application/x-www-form-urlencoded),
则无需将 Content-Type 设置为 multipart/form-data。在使用 MultipartBodyBuilder 时总是这样,这确保了 HttpEntity
包装器。
作为 MultipartBodyBuilder 的替代方案,你还可以通过内置的 BodyInserters 提供内联样式的multipart内容,如以下示例所示:
    import static org.springframework.web.reactive.function.BodyInserters.*;

    Mono<Void> result = client.post()
            .uri("/path", id)
            .body(fromMultipartData("fieldPart", "value").with("filePart", resource))
            .retrieve()
            .bodyToMono(Void.class);
2.5. 客户端过滤器
你可以通过 WebClient.Builder 注册客户端过滤器(ExchangeFilterFunction),以拦截和修改请求,如以下示例所示:
WebClient client = WebClient.builder()
        .filter((request, next) -> {

            ClientRequest filtered = ClientRequest.from(request)
                    .header("foo", "bar")
                    .build();

            return next.exchange(filtered);
        })
        .build();
这可以用于跨领域的关注,例如:身份验证。以下示例使用过滤器通过静态工厂方法进行基本身份验证:
import static org.springframework.web.reactive.function.client.ExchangeFilterFunctions.basicAuthentication;

WebClient client = WebClient.builder()
        .filter(basicAuthentication("user", "password"))
        .build();
过滤器全局应用于每个请求。要更改特定请求的过滤器行为,你可以将请求属性添加到 ClientRequest,然后链中的所有过滤器都可以访问该请求属性,如以下示例所示:
WebClient client = WebClient.builder()
        .filter((request, next) -> {
            Optional<Object> usr = request.attribute("myAttribute");
            // ...
        })
        .build();

client.get().uri("http://example.org/")
        .attribute("myAttribute", "...")
        .retrieve()
        .bodyToMono(Void.class);

    }
你还可以复制现有的 WebClient,插入新的过滤器或删除已注册的过滤器。以下示例在索引0处插入一个基本身份验证过滤器:
import static org.springframework.web.reactive.function.client.ExchangeFilterFunctions.basicAuthentication;

WebClient client = webClient.mutate()
        .filters(filterList -> {
            filterList.add(0, basicAuthentication("user", "password"));
        })
        .build();
2.6. 同步使用
通过在结果末尾进行阻塞,可以以同步方式使用 WebClient:
Person person = client.get().uri("/person/{id}", i).retrieve()
    .bodyToMono(Person.class)
    .block();

List<Person> persons = client.get().uri("/persons").retrieve()
    .bodyToFlux(Person.class)
    .collectList()
    .block();
但是,如果需要进行多次请求,则可以避免单独阻塞每个响应,而等待合并的结果,这样会更有效:
Mono<Person> personMono = client.get().uri("/person/{id}", personId)
        .retrieve().bodyToMono(Person.class);

Mono<List<Hobby>> hobbiesMono = client.get().uri("/person/{id}/hobbies", personId)
        .retrieve().bodyToFlux(Hobby.class).collectList();

Map<String, Object> data = Mono.zip(personMono, hobbiesMono, (person, hobbies) -> {
            Map<String, String> map = new LinkedHashMap<>();
            map.put("person", person);
            map.put("hobbies", hobbies);
            return map;
        })
        .block();
以上仅是一个示例。还有许多其他模式和运算符可用于构建响应式管道,该响应式管道可进行许多远程调用(可能是嵌套的,相互依赖的),而不会阻塞到最后。
使用 Flux 或 Mono,你永远不必阻塞Spring MVC或Spring WebFlux控制器。
只需从控制器方法返回结果的响应式类型。相同的原则适用于Kotlin Coroutines和Spring WebFlux,只需在控制器方法中使用suspending function或返回 Flow 即可。
|
2.7. 测试
要测试使用 WebClient 的代码,可以使用模拟Web服务器,例如: OkHttp MockWebServer。
要查看其用法示例,请查看Spring Framework测试套件中的
WebClientIntegrationTests
或OkHttp存储库中的 static-server示例。
3. 测试
spring-test 模块提供 ServerHttpRequest,ServerHttpResponse 和 ServerWebExchange 的Mock实现。
有关模拟对象的讨论,请参见Spring Web Reactive。
WebTestClient
建立在这些模拟请求和响应对象的基础上,以提供对测试不使用HTTP服务器的WebFlux应用程序的支持。
你也可以将 WebTestClient 用于端到端集成测试。